A Shiny application that leverages React.js to build the UI.
Full-stack analytical solution:
Python scripts generating sample sales and production data.
R backend responsible for parsing the data, the heavy-weight calculations but also hosting the GUI.
React.js project which serves as app’s frontend.
CI/CD pipeline in a form of GitHub Actions for automatic app deployment to shinyapps.io.
Key features and advantages:
App’s frontend is built entirely with React. This makes the GUI development process extremely easy, especially when using the watch mode. It also gives access to an enormous number of JS libraries available in npm.
Shiny and R are responsible for doing the calculations on large amounts on data. It all happens on the server and the results are sent to the GUI with the help of shinyjs. Thanks to that, the app is not a burden for user’s machine and runs smoothly on mobile.
Because of the fact that servers also have their limits, optimizations were made to decrease the load when multiple users use the app concurrently. Example: datasets are read only once per app’s lifetime and this data is shared between user sessions.
In this example, data is stored in and read from CSV files. It’s easy however to alter this logic and establish a database connection for instance. Use the refresh button to get most current values without reloading the app.
Source code of the UI (a typical React project created with Create React App) is contained in the ui directory. A Shiny app needs pure HTML, JS and CSS files, which are React build artifacts, in the www directory.
You firstly need to install React project’s dependencies:
cd ui
npm install
And then build the UI:
npm run build
Build artifacts will be automatically copied to the www directory.
Generate sample data
Sample CSV files are contained in this repo but if you want it different, there is a Python script that prepares sample CSV files with data used in the Shiny app. Firstly make sure you have the libraries needed:
pip install Faker pandas
Generate the data by running the script
python data/fake_data_generator.py
You can modify the script to change date ranges and other characteristics.
Usage
Open the app.R file in RStudio and click on the Run App button.
ROS1 Package for a UAV with Three Planar Thrusters as Add-On
Overview
This ROS1 package extends the capabilities of a UAV by adding three planar thrusters. The thrusters are strategically positioned to provide additional control and maneuverability along the horizontal plane. This package integrates with the existing UAV control system to enable planar thrust adjustments.
Features
Planar Thrusters: Three additional thrusters attached to the UAV, designed for planar control.
Enhanced Maneuverability: The planar thrusters enable enhanced control and maneuverability in the horizontal plane.
ROS1 Integration: Seamless integration with the ROS1 ecosystem for easy configuration and control.
ℹ️ Important: This repo is no longer maintained; we invite all people learning Solidity to head to Cyfrin Updraft! The 100% free #1 smart contract education platform on earth. Developed with love by Patrick & Cyfrin <3
SmartContract Lottery
This is a repo to work with and create a truely random smart contract lottery in a python environment. If you’re brand new to solidity, be sure to check out FreeCodeCamp. If you’re new to brownie, check out the Brownie documentation. If you’re brand new to Chainlink, check out the beginner walkthroughs in remix to learn the basics.
You can get a WEB3_INFURA_PROJECT_ID by getting a free trial of Infura. At the moment, it does need to be infura with brownie. If you get lost, you can follow this guide to getting a project key. You can find your PRIVATE_KEY from your ethereum wallet like metamask.
And update the brownie config accordingly. There is a deploy_mocks script that will launch and deploy mock Oracles, VRFCoordinators, Link Tokens, and Price Feeds on a Local Blockchain.
Deploy to a testnet / Scripts
brownie run scripts/1_deploy_lottery.py
brownie run scripts/2_start_lottery.py
brownie run scripts/3_enter_lottery.py
brownie run scripts/4_end_lottery.py
This will deploy your lottery, fund it with LINK, start your lottery, you’ll enter it, and then end your lottery. You can also work with the console to do these.
You can deploy and work with a local network by deploying mocks.
Tests are really robust here! They work for local development and testnets. There are a few key differences between the testnets and the local networks. We utilize mocks so we can work with fake oracles on our testnets.
To test development / local
brownie test
To test mainnet-fork
This will test the same way as local testing, but you will need a connection to a mainnet blockchain (like with the infura environment variable.)
brownie test --network mainnet-fork
To test a testnet
Sepolia is currently supported
brownie test --network kovan
Adding additional Chains
If the blockchain is EVM Compatible, adding new chains can be accomplished by something like:
This is my second (and more successful) attempt. The first version was built on GitHub Pull Requests & Travis with MochaJS tests.
Unfortunately version one had some problems: specifically volume. In classes of 25 or more students Travis would start to choke at the end when everybody was trying to finish their work on time. There would be upwards of 25 pull requests going into Travis per minute with many requested tests to complete. It was just too slow, sometimes tests would take 20–30 minutes to complete, or just stop.
The user experience wasn’t great for the students and also a little stressful for me, so I switched to a desktop app built with Electron and (practically) the same Javascript tests.
Having the desktop app allows all the tests to be run locally and much more efficiently.
Use cases
Students will fork assignment repositories from GitHub, make their changes, and drop it into Markbot. Markbot will run a battery of tests on the code and report back with the results, allowing the finalized work to be submitted & graded.
This is great for code assignments that are pass/fail—I use it in my courses. If they pass the tests then the system automatically sets their grade to complete.
It also works for non-pass/fail assignments but the grade submission component will only assign 1 point to their assignment—which I think makes sense because, I as the teacher, would then go in and do a complete assessment of their work.
Set up
There’s a few things you’ll need to do to set the repo up properly for Markbot.
There is some cheat prevention build into Markbot—it’s not perfect but it’s annoying enough for students to work around that it’s just faster to do the homework.
In the “Develop” menu there’s an option named “Lock Requirements”—this should be done for every assignment or the student will get marked as a cheater.
It will hash the .markbot.yml file and the screenshots and put the hashes into a .markbot.lock file. If any of the HTML, CSS or JS files are marked as locked: true they will also be hashed into the lock file.
If Markbot detects any changes to these files the user will be marked as a cheater and given a grade of 0 with Markbot Server.
Lock the requirements right at the end to make sure everything is exactly how you want it to be.
How the students use it
The students will fork repos then drop into Markbot which will automate the marking.
All the tests are set up and ready to go and inside the Markbot application. They can be configured from a .markbot.yml file.
Place the .markbot.yml file in the folder you want to test. Normally this is done when setting up a repository on GitHub that students would fork.
Here are the properties that you can use in the Markbot file for testing:
repo — used as an indicator in the app screen, for liveWebsite, & as part of the automatic grade submission
canvasCourse — used as part of the Canvas integration. This option will be deprecated in the future but is currently used as a trigger for submissions to Progressinator.
namingIgnore — an array of paths that allows certain filenames to bypass the naming conventions check.
commits — the minimum number of commits students need—will automatically subtract your commits.
liveWebsite — whether to make a HEAD request to the GitHub URL to check that it’s accessible or not. Requires the repo entry. If the repo isn’t set up with gh-pages or the student hasn’t synced any commits a 404 will be issued, failing the test.
repo: markbotcanvasCourse: web-dev-1naming: truecommits: 3liveWebsite: truerestrictFileTypes: true# Other tests, described below, would go here
Git & GitHub checks
Using the git entry we can enforce some requirements on the status of the student’s Git repo.
This is a replacement for the simple commits entry.
git:
# The minimum number of commits students need—will automatically subtract your commits.numCommits: 2# Force the students to make sure all their files are committed.allCommitted: true# Force the students to make sure all their files are pushed & synced.allSynced: true# Confirm specific best practices on the last 5 Git commit messages.# Won’t prevent students from handing assignments in will only show warnings.# (Spelling & grammar, minimum word & character length, no trailing periods, attempts to enforce present-tense imperative verbs at the start)bestPractices: true
HTML file tests
Use the html entry to test HTML files, it’s an array of objects, each representing a file to test.
The path option is the only one that’s required—leaving any of the others off will skip the test.
html:
# The HTML file’s path
- path: 'index.html'# Whether the code in this file should be locked or not, to help prevent students from changing the code# I use it for assignments where I give them complete HTML & they just write the CSS or JS# With locked on, there isn’t much point providing the rest of the optionslocked: true# Whether to validate it or notvalid: true# Check its best practices & indentation (double quoting attributes, having a <title>, indented children, etc.)# Can be further configured in the `htmlcs.json` file# Will be skipped if validation isn’t also checked—the document must be valid firstbestPractices: true# Check if the headings are in the proper order and that the document starts with an <h1># Will be skipped if validation isn’t also checked—the document must be valid firstoutline: true# Run accessibility tests on the HTML documents using AxeCore# It’s usually more convenient to just inherit the accessibility template which includes more testsaccessibility: true# Can be used to test for specific elements; each entry should be a valid CSS selector# Will be skipped if validation isn’t also checked—the document must be valid first# If given an array, the second argument can be a custom error messagehas:
- 'header nav[role="navigation"]'
- 'main'
- ['header nav li a[class][href*="index.html"]', 'The navigation should be highlighted on this page']# You can emit warnings that won’t prevent students from submitting work using an alternative syntax
- check: 'main'# This could also be `selector: 'main'`message: 'The `main` tag should be included for accessibility reasons'type: 'warning'# You can specify a limit for how many times an element should be inside the HTML code
- check: '[role="banner"]'message: 'The “banner” role is used to define the header of the whole website so there should be only one per page'limit: 1# Can be used to test that specific selectors are not used in the HTML# I would use this for ensuring that `<hr>` tags aren’t used when borders should be or that `<br>` tags aren’t used# Will be skipped if validation isn’t also checked—the document must be valid first# If given an array, the second argument can be a custom error messagehasNot:
- 'br'
- ['hr', 'The `hr` tag should not be used to create borders']# Warnings too!
- selector: 'hr'message: 'The `hr` tag should not be used to create borders'type: 'warning'# Regex searches on the file, for confirming specific content# If given an array, the second argument can be a custom error messagesearch:
- 'Hello World!'
- ['Hello World!', 'Whoa, don’t be so grumpy, say “Hello”']# And warnings!
- regex: 'Hello World!'# (Using `check` instead of `regex` is okay too, so everything can be consistent)message: 'Whoa, don’t be so grumpy, say “Hello”'type: 'warning'# Limits work inside search to prevent content duplicationlimit: 1# Regex searches on the file, for confirming specific content isn’t found# If given an array, the second argument can be a custom error messagesearchNot:
- 'Thing-a-magic'# Warnings too!
- check: 'Thing-a-magic'type: 'warning'# Confirm that the code file has less than or equal to this many linesmaxLines: 4
CSS file tests
Use the css entry to test CSS files, with many of the same options as the HTML.
css:
# The CSS file’s path
- path: 'css/main.css'# Whether the code in this file should be locked or not, to help prevent students from changing the code# I use it for assignments where I give them complete CSS & they just write the HTML or JS# With locked on, there isn’t much point providing the rest of the optionslocked: true# Whether to validate it or notvalid: true# Check its best practices & indentation (spaces after colons, new lines after closing blocks, etc.)# Can be further configured in the `stylelint.json` file# Will be skipped if validation isn’t also checked—the document must be valid firstbestPractices: true# Can be used to test for specific selectors, properties & values# [selector, property (optional), value (optional)]# Will be skipped if validation isn’t also checked—the document must be valid firsthas:
- ['.thing']
- ['.super', 'background-image']
- ['.thang', 'width', '50px']# Starting the array with an `@` and a matching string will look inside media queries
- ['@38em', 'html', 'font-size', '110%']# Adding another argument at the end will be a custom error message
- ['html', 'font-size', '100%', 'The `font-size` should always be `100%`']
- ['@38em', 'html', 'font-size', '110%', 'The `font-size` should always increase at `38em`']# You can include all that same complexity with warnings
- check: ['@38em', 'html', 'font-size', '110%', 'The `font-size` should always increase at `38em`']type: 'warning'# Or a little cleaned-up version, can be used with or without warnings
- mediaQuery: '@38em'selector: 'html'property: 'font-size'value: '110%'message: 'The `font-size` should always increase at `38em`'type: 'warning'# Can be used to test that specific selectors do not contain certain properties# I would use this for ensuring as little CSS duplication as possible, like forcing students to use multiple classes# [selector, [property, property, etc.]]# Will be skipped if validation isn’t also checked—the document must be valid firsthasNot:
- ['.btn-ghost', ['display']]
- ['.btn-subtle', ['font-size', 'text-decoration']]# Starting the array with an `@` and a matching string will look inside media queries
- ['@110em']# Adding another argument at the end will be a custom error message
- ['.btn-subtle', ['font-size', 'text-decoration'], 'The `.btn-subtle` shouldn’t be used']
- ['@110em', '.btn-subtle', ['font-size', 'text-decoration'], 'The `.btn-subtle` shouldn’t be used']# Also with warnings!
- check: ['.btn-ghost', ['display']]type: 'warning'# Regex searches on the file# If given an array, the second argument can be a custom error messagesearch:
- '@keyframes'
- ['@viewport', 'The `@viewport` should be included for the best browser compatibility']# Warnings—woot!
- check: '@keyframes'type: 'warning'# Limits work inside search to prevent content duplicationlimit: 1# Regex searches on the file for confirming certain things don’t exist# If given an array, the second argument can be a custom error messagesearchNot:
- ['@media.+\(.*max-width', 'Media queries with `max-width` should not be used — use `min-width` instead']
- ['@media.+\(.*px', 'Pixel units should not be used in media queries — use `em` instead']
- ['font-size\s*:\s*.+px', 'Pixel units should not be used for `font-size` — use `rem` instead']# Using the object syntax and `type` there can also be warning messages
- check: 'font-size\s*:\s*.+px'message: 'Pixel units should not be used for `font-size` — use `rem` instead'type: 'warning'# Confirm that the code file has less than or equal to this many linesmaxLines: 4
Javascript file tests
Use the js entry to test Javascript files.
js:
# The JS file’s path
- path: 'js/main.js'# Whether the code in this file should be locked or not, to help prevent students from changing the code# I use it for assignments where I give them complete JS & they just write the HTML or CSS# With locked on, there isn’t much point providing the rest of the optionslocked: true# Whether to validate/lint it or not using a series of best practices# Can be further configured in the `validation/eslint.json` filevalid: true# Check its best practices & indentation (semicolons, spacing around brackets, etc.)# Can be further configured in the `best-practices/eslint.json` file# Will be skipped if validation isn’t also checked—the document must be valid before best practices are testedbestPractices: true# Regex searches on the filesearch:
- 'querySelector'
- 'addEventListener'# Using a slightly different syntax you can create warnings that don’t prevent the user from submitting
- check: 'querySelectorAll'type: 'warning'# Limits work inside search to prevent content duplicationlimit: 1# Regex searches on the file for confirming certain things don’t exist# If given an array, the second argument can be a custom error messagesearchNot:
- 'document.write\('
- ['console.log\(', 'The `console.log()` function should not be left in your code after you’ve finished debugging']# Warnings work too!
- check: 'console.log\('message: 'The `console.log()` function should not be left in your code after you’ve finished debugging'type: 'warning'# Confirm that the code file has less than or equal to this many linesmaxLines: 4
Screenshot comparisons
Markbot can be used to compare student work against reference screenshots included in the repository.
screenshots:
# The path to the HTML file that will be screenshot
- path: 'index.html'# An array of different screen widths for taking screenshotssizes: [400, 650, 960]# OR: use the alternative object syntax to control the allowed percentage for each screenshot# This will bypass the default percentages (see below)# The syntax is `screenshot-width: allowed-difference-percentage`sizes:
400: 10650: 10960: 8# If you’d like to capture the printed version of the website, send `print` as one of the sizessizes: ['print']# If there are multiple screenshots of the same path the label is required to distinguish them (it’s used in the filenames)# It can also be used to add a little extra information to the check listlabel: 'Clicked'# By default animations & transitions are generally disabled using the * selector and !important# This will allow you to enable them again# Be careful to wait for them to complete before taking a screenshot# Something like: on('.elem', 'animationend', done);allowAnimations: true# Execute some Javascript before capturing the screenshots# Happens immediately, before the first screenshot is taken and is not repeated for each size# Has access to all the same functions as the `functionality` tests with a few small exceptions:# - `pass()` & `fail()` don’t exist# - `done()` must be called when the screenshot capturing should beginbefore: | on('.btn', 'transitionend', () => { done(); }); activate('.btn');
Markbot will look in the screenshots folder for images to compare against.
The screenshots should be generated using Markbot itself for the most consistency—trigger the “Develop” menu (See Environment variables) and press “Generate Reference Screenshots”.
Markbot will display differences to students highlighted in a black & white difference image. Difference percentages are calculated and anything with a difference greater than 10%–13% is considered an error.
The difference percentage is calculated based on the area of the image, following this formula:
The difference percentage is a sliding scale because as the screenshot area increased the percentage must go down to maintain a similar level of strictness.
An example of screenshot difference errors.
Students can enlarge the difference screenshot into a split view window for clearer understanding.
Markbot split view screenshot comparison tool.
Functionality tests
Markbot has the ability to run arbitrary Javascript code against an HTML file. This is great for running integration and functionality tests on student code to make sure their Javascript is doing the right thing.
Use the functionality entry in the .markbot.yml file to add tests for HTML files.
Each entry in the functionality list will perform the following actions:
The path will be loaded into a hidden browser window
When the website has finished loading the testing will start
Markbut will run through every entry in the tests array
Each Javascript test will be run inside a function that gets injected into the fully loaded page
If the test calls the pass() function, then the test passes, otherwise it should call the fail() function with a string describing the problem
If a single test doesn’t pass the remainder of the tests will not execute.
Here’s an example from one of my assignments:
functionality:
# The path to the HTML file to load in a hidden browser window
- path: "index.html"# The label can be used to help distinguish tests in the check list — it’s completely optional# When you need a full refresh of the page, including another test with the same path makes sense# But then they’re all listed the same in the check list# Label gives you the ability to slightly distinguish the test nameslabel: "Dinosaur link"# A replacement for individual tests# Will just confirm that there are no Javascript errorsnoErrors: true# This Javascript code will be injected into the page before it loads# The feature exists mainly so I can overwrite built-in features like `prompt()` to test user inputsetup: | window.prompt = function () { return 'a'; }# An array of Javascript code pieces to run against the live websitetests:
- | let ball = $('.ball'); let currentColour = css(ball).backgroundColor; $('input[type="color"]').value = '#ffee66'; $('form').dispatchEvent(ev('change')); if (currentColour == css(ball).backgroundColor) fail('The ball’s colour doesn’t change'); pass();
Each test entry will be embedded into a Javascript anonymous self-executing function with a try-catch block, like this:
(function(){'use strict';try{eval("(function(){'use strict';/* Your test code will be embedded here */}())");}catch(e){/* Show error messages in Markbot & console */}}());
Yes, eval is evil, etc. But it’s useful here to catch any syntax errors you may have in your code so they can be displayed in the debugging console.
Also notice that your test code will be wrapped in a self-executing function, this allows you to use return to short-circuit functions when they fail or pass.
Your injected code will have access to a few functions to simplify what you have to write:
pass() — Tell Markbot that this test has passed
fail(reason) — Tell Markbot that this test has failed
The reason should be a string that will be shown to the user in Markbot’s error list
debug(...args) — For when writing the tests, to help you debug your test code
What ever is passed into debug() will be written to the console
$(selector[, target = document]) — Instead of having to write document.querySelector()
The target parameter allows you to use querySelector() on elements other than document—but defaults to document
If the selector isn’t found on the page the test will fail with an error message
$$(selector[, target = document]) — Instead of having to write document.querySelectorAll()
The target parameter allows you to use querySelectorAll() on elements other than document—but defaults to document
If the selector isn’t found on the page the test will fail with an error message
css(element) — A shortcut to getComputedStyle()
bounds(element) — A shortcut to getBoundingClientRect()
offset(element) — Returns the complete offset for the element to the top and left of the page, using getBoundingClientRect() + scrollY/X for the calculation.
Returns an object in the format:
{left: 0,top: 0,}
on(selector/element, eventname, callback[, timeoutlength = 2000]) — This is instead of using addEventListener. The problem with addEventListener is timing.
If the student’s code uses event delegation, but yours listens directly on the element, your listener will be fired first.
Using on() will always bind to the document and listen for the event to bubble back upwards—guaranteeing that your listener gets called second.
selector/element a pre-selected DOM element object or CSS selector to match for the target for your event.
eventname is any standard event like click, animationend, etc.
callback is a function that will be executed when the event is triggered. It will receive two arguments:
hasError — (bool): whether or not the timeout was executed, meaning the event was never triggered. Set to true when there is an error and false otherwise.
ev — the standard Javascript event object passed through.
timeoutlength is an optional argument you can pass to control the maximum length the listener will wait to be called.
ev(eventString[, options]) — Can be used to fire an event with dispatchEvent()
It creates a new Event, new MouseEvent or new KeyboardEvent
options has a default of: {bubbles: true, cancelable: true}
If you provide an options argument it will be merged with the defaults
hover(selector/element, callback) — A specialized event dispatch that hovers the mouse over an element—regular JS events aren’t “trusted” and therefore won’t trigger the CSS :hover styles.
Allows for testing to make sure student’s apply hover states to elements in CSS.
selector/element a pre-selected DOM element object or the CSS selector of the target for your event.
callback is a function that will be executed when the hover has triggered.
activate(selector/element, callback) — A specialized event dispatch that “activates” an element triggering the CSS :active styles.
Allows for testing to make sure student’s apply active states to elements in CSS.
selector/element a pre-selected DOM element object or the CSS selector of the target for your event.
callback is a function that will be executed when the hover has triggered.
send(eventname[, options[, callback]]) — sends trusted input events to the browser window. This is what hover() and activate() do internally.
It’s essentially a wrapper around Electron’s webContents.sendInputEvent()—See the Electron docs.
eventname is one of Electron’s allowed events: mouseDown, mouseUp, mouseEnter, mouseLeave, contextMenu, mouseWheel, mouseMove, keyDown, keyUp, char
options allows you to set extra properties, like Electron’s modifiers. But most importantly it sets the isTrusted flag to true by default to allow hover, etc. activate the CSS changes.
Here’s an example of using ev() and on():
functionality:
- path: 'index.html'tests:
- | let btn = $('.btn'); let btnFill = $('path:nth-child(2)', btn); on('.btn path:nth-child(2)', 'transitionend', function (err, ev) { if (err) fail('The transition on the button’s coloured setion never ends—check that is has a transition'); if (oldBtnFill == css(btnFill).fill) fail('The button doesn’t change colour'); pass(); }); btn.dispatchEvent(ev('click'));
Here’s an example of using hover():
functionality:
- path: 'index.html'tests:
- | let a = document.querySelector('a'); let oldBg = css(a).backgroundColor; hover('a', function () { if (css(a).backgroundColor == oldBg) fail('The hover colour doesn’t change on the link'); pass(); });
Markdown tests
Markbot can check Markdown files looking for validation & best practices. It can also search inside the files for specific content.
If the Markdown files have YAML front matter that will also be validated with the same processor used by the YAML file checking.
The path option is the only one that’s required—leaving any of the others off will skip the test.
md:
# The file’s path
- path: "README.md"# Check validation & best practices following a specific Markdown formatvalid: true# Regex searches on the file, for confirming specific content# If given an array, the second argument can be a custom error messagesearch:
- 'Dinosaurs'
- ['T\. Rex', 'Expected to see the T. Rex described']# Warnings will work too!# And so do limits!# Regex searches on the file, for confirming specific content isn’t found# If given an array, the second argument can be a custom error messagesearchNot:
- 'Mammals'# Warnings will work too!
YAML tests
Markbot can check YAML files looking for validation & best practices. It can also search inside the files for specific content.
The path option is the only one that’s required—leaving any of the others off will skip the test.
yml:
# The file’s path
- path: "data.yml"# Check validation & best practicesvalid: true# Regex searches on the file, for confirming specific content# If given an array, the second argument can be a custom error messagesearch:
- 'Mammals'
- ['Dimetrodon', 'Should have explained that the Dimetrodon isn’t a dinosaur']# Warnings will work too!# And so do limits!# Regex searches on the file, for confirming specific content isn’t found# If given an array, the second argument can be a custom error messagesearchNot:
- 'Dinosaurs'# Warnings will work too!
File & image tests
Markbot can check random plain text files and images for specific features.
Images (.jpg, .png): compare dimensions, compare file size, check if metadata has been removed by smushing.
Text files: compare file size, check if it’s empty, search/not with regexes, check for smushing with removal of line-breaks.
Favicons (.ico): — Favicons can be checked but they won’t be checked for smushing or dimensions—Markbot always enforces 16 & 32 pixels sizes in favicons.
SVG (.svg) — SVG are treated as hybrids: dimensions can be checked even though they’re technically text files (Markbot will look at the width, height, and viewBox attributes) and smushing only checks for line breaks.
Use the files entry to test images and text files, it’s an array of objects, each representing a file to test.
The path option is the only one that’s required—leaving any of the others off will skip the test.
files:
# The file’s path
- path: "images/mars-2.jpg"# Essentially checks to make sure the file doesn’t exist# All other checks will be ignoredexists: false# The maximum allowed file size represented in kilobytes (kB)maxSize: 300# For images only# The maximum/minimum allowed widthmaxWidth: 3000minWidth: 320# For images only# The maximum/minimum allowed heightmaxHeight: 1500minHeight: 240# Check if the image/file has been smushed# For images it’ll look for extraneous metadata, something ImageOptim would remove# For text files & SVGs it’ll just look for line breakssmushed: true# For text files only# Regex searches on the file, for confirming specific content# If given an array, the second argument can be a custom error messagesearch:
- '^Sitemap\:.+sitemap\.xml\s+?$'# Warnings will work too!# And so do limits!# For text files only# Regex searches on the file, for confirming specific content isn’t found# If given an array, the second argument can be a custom error messagesearchNot:
- 'Allow:'
- ['Disallow\:\s*\/', 'The disallow all directive (`Disallow: /`) should not be used']# Warnings will work too!# OR…# Just pass a directory & rely on the `allFiles` directive described below
- directory: "images"
Performance testing
Markbot can check the performance of a website on simulated networks—or without network throttling. Markbot will check specific performance statistics and compare them to a performance budget.
The path option is the only one that’s required. If only the path is included the default performance budget will be used.
performance:
# The path to an HTML file to load and test
- path: 'index.html'# The network speed (see list below)speed: 'WIFI'budget:
# Milliseconds for maximum load timemaxLoadTime: 1000# Maximum number of assetsmaxRequests: 15# Maximum page size of all assets in kilobytes (kB)maxSize: 800# Maximum number of fonts allowed on the pagemaxFonts: 5
Simulated networks speeds
Markbot has a few simulated network speeds built in—you can see all the details of in the app/networks.js file.
WIFI-FAST
WIFI-REGULAR (WIFI)
DSL
4G-REGULAR (4G)
3G-GOOD (3G)
3G-REGULAR
2G-GOOD (2G)
2G-REGULAR
GPRS
The names in the brackets are shortcuts: using speed: '4G' is exactly the same as speed: '4G-REGULAR'.
Default performance budget
Here’s the default performance budget that Markbot will use if you don’t specify your own. If you leave one of the performance budget options off, Markbot will add the missing properties from the default budget.
If you want the same values to work for all files of the same type in a project you can use the allFiles entry. With the all files entry we can set defaults that would be applied to all the selected files.
allFiles:
# Supports any of the entries that `html` supportshtml:
valid: truebestPractices: trueoutline: trueperformance: truehas:
- 'h1'# There’s also a screenshots entry to take screenshots for all HTML files specified# Creates a `screentshots.path` entry for each HTML filescreenshots: [320, 400, 608, 960, 1440]# You can add the `except` entry to all types to prevent all these defaults from applying to specific filesexcept:
- 'test.html'# Supports any of the entries that `css` supportscss:
valid: true# Supports any of the entries that `js` supportsjs:
valid: true# Supports any of the entries that `md` supportsmd:
valid: true# Supports any of the entries that `yml` supportsyml:
valid: true# The functionality tests will be applied to every HTML file# Supports any of the entries that `functionality` supportsfunctionality:
noErrors: true# Supports any of the entries that `files` supportsfiles:
maxWidth: 2500maxHeight: 2500maxSize: 300smushed: true# Supports any of the entries that `performance` supportsperformance:
speed: '3G'html:
- path: index.html
- path: about.htmlhas:
- 'h2'files:
- path: 'images/dino.jpg'performance:
- path: 'index.html'
With this setup everything from the allFiles->html entry would be applied to all the HTML files listed below—to help alleviate duplication.
Adding functionality into the allFiles entry will test that functionality on every HTML file listed in the html entry.
Unique information for all files
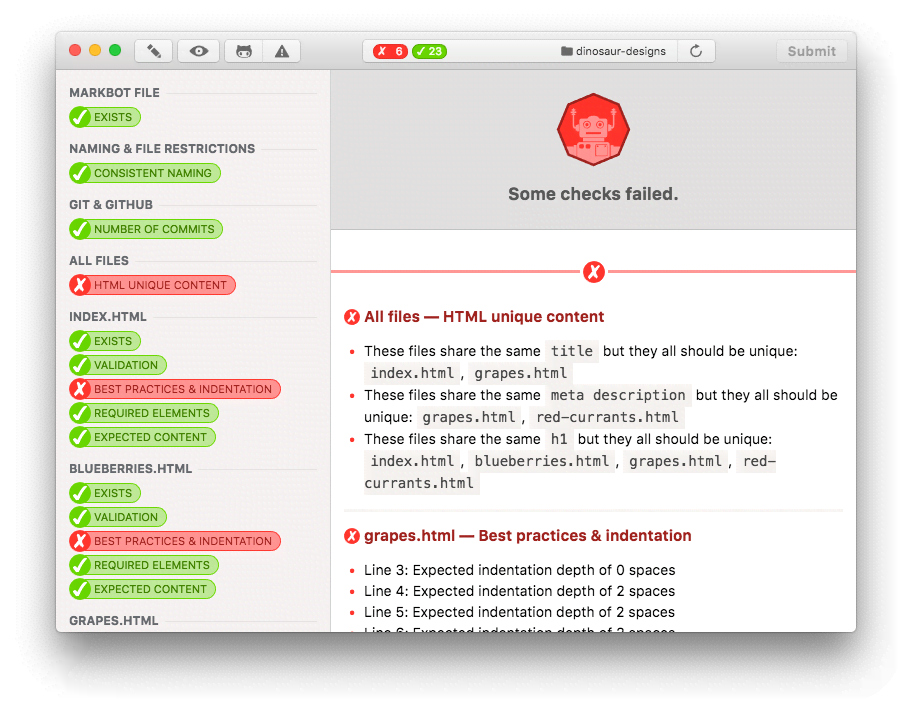
With the allFiles entry, for HTML, we can check for uniqueness between the files: e.g. unique <title> tags or unique meta description tags.
allFiles:
html:
unique:
- 'title'# Using an array, the second item will be used in the error message as the description# I use this to make the error messages a little simpler to understand# Without the second entry, the error message will just write the selector
- ['meta[name="description"][content]', 'meta description']
- 'h1'
The above set up would force all the HTML files to have different title tags, meta descriptions and <h1> tags.
The unique entry expects each item to be a valid CSS selector, similar to has & hasNot.
If you want to check attribute content, select with the attribute selector. Markbot will grab the last selected attribute and compare its content. In the example above, Markbot is comparing the content attribute.
Inheriting from templates
Markbot has a bunch of templates inside the templates folder that your Markbot files can inherit from, thereby getting all the requirements specified in that file. Your Markbot file is more powerful and will overwrite entries—but things like has, search, etc. will be merged together.
The templates are just standard Markbot files, with all the same properties.
To inherit from the built-in templates add an inherit property to your Markbot file—it’s a list of all the templates to use:
In the above scenario, everything from the all those templates will be applied to your Markbot file (overwrites based on order) and therefore to the index.html file.
The Markbot ignore file
You can get Markbot to ignore files within your project directory when using the allFiles option. Include a .markbotignore file in the same location as your .markbot.yml and it’ll be loaded in.
It doesn’t support glob patterns only simple file and folder paths.
Here’s an example:
pattern-library.html
patterns/typography       # Since this is a directory everything within would be ignored
patterns/grid
patterns/brand
patterns/icons
patterns/modules
common/grid.css
common/type.css
common/modules.css
Installation on student computers
Before getting Markbot working on student machines, these two things should be downloaded and installed on the user’s computer.
Git
Use the Mac OS X Terminal and install the command line tools with xcode-select --install
On Windows, install Git directly from the website. When installing, on the “Adjusting your PATH environment” screen, switch to “Use Git from the Windows Command Prompt”.
JDK
Because Markbot shells out to two JAR files, the JDK must be available on the user’s computer.
These will allow you to enable the “Develop” menu on your computer and create locking hashes for screenshots, code files, and the .markbot.yml file itself.
To configure your installation of Markbot you’ll need to adjust the config file.
Rename config.example.json to just config.json and change the following options:
ignoreCommitEmails — (array) the list of email addresses to ignore when counting commits.
You should probably leave this setting alone unless you choose to host your own copy of Learn the Web’s Progressinator.
progressinatorApi — (string) the URL to the Progressinator instance hosted on Learn the Web.
3. Passcode hashing & embedding
After you’ve created your config.json file and created the two environment variables, run the following command: npm run hash-passcode.
The hash-passcode script will generate a secret key and hash your password, embedding both into your config.json.
The hashed passcode isn’t really for security, it only uses HMAC-SHA512. The purpose is really to be sufficiently annoying that students will do their work instead of figuring out how to cheat Markbot.
Don’t forget to copy this hashed passcode into Progressinator.
4. HTTPS certificate generation
Markbot spins up a web server internally to help with performance testing and website loading. The web server uses HTTPS—though it is just a self-signed certificate. The private key and public certificate need to be generated with openssl before Markbot can work.
In your terminal run:
npm run gen-https-cert
The script will create the appropriate files and place them into the app directory.
While Markbot is running the tested website will be available at https://127.0.0.1:PORT with a randomly assigned port number.
5. Markbot dependencies
Markbot has a few external dependencies that it shells out to internally:
Git
Nu HTML validator (JAR)
CSS validator (JAR)
LanguageTool (JAR)
The vendor folder should contain a bunch of JAR files for the HTML validator, the CSS validator and LanguageTool.
HTML validator
The vendor/html-validator folder should contain the vnu.jar—the pre-built binary works well.
(Further down the page, look for: “Stand-alone for the Desktop”)
Copy the following items into the vendor/languagetool folder:
languagetool-commandline.jar
libs/
META-INF/
org/
Add more words to the dictionary
Find the English dictionary, here:
org/languagetool/resource/en/hunspell/ignore.txt
Copy all the text from words-to-add.txt (it’s inside the vendor folder) into the bottom of ignore.txt
Make sure there are no blank lines between the words.
PDFBox
The PDFBox application is used primarily for checking screenshots of printed versions of websites—used to convert printed PDFs into PNGs for comparison. It’s another Java JAR to install in the vendor folder.
Go here and download the “Command line tools” pdfbox-app-0.0.0.jar package:
This is my second (and more successful) attempt. The first version was built on GitHub Pull Requests & Travis with MochaJS tests.
Unfortunately version one had some problems: specifically volume. In classes of 25 or more students Travis would start to choke at the end when everybody was trying to finish their work on time. There would be upwards of 25 pull requests going into Travis per minute with many requested tests to complete. It was just too slow, sometimes tests would take 20–30 minutes to complete, or just stop.
The user experience wasn’t great for the students and also a little stressful for me, so I switched to a desktop app built with Electron and (practically) the same Javascript tests.
Having the desktop app allows all the tests to be run locally and much more efficiently.
Use cases
Students will fork assignment repositories from GitHub, make their changes, and drop it into Markbot. Markbot will run a battery of tests on the code and report back with the results, allowing the finalized work to be submitted & graded.
This is great for code assignments that are pass/fail—I use it in my courses. If they pass the tests then the system automatically sets their grade to complete.
It also works for non-pass/fail assignments but the grade submission component will only assign 1 point to their assignment—which I think makes sense because, I as the teacher, would then go in and do a complete assessment of their work.
Set up
There’s a few things you’ll need to do to set the repo up properly for Markbot.
There is some cheat prevention build into Markbot—it’s not perfect but it’s annoying enough for students to work around that it’s just faster to do the homework.
In the “Develop” menu there’s an option named “Lock Requirements”—this should be done for every assignment or the student will get marked as a cheater.
It will hash the .markbot.yml file and the screenshots and put the hashes into a .markbot.lock file. If any of the HTML, CSS or JS files are marked as locked: true they will also be hashed into the lock file.
If Markbot detects any changes to these files the user will be marked as a cheater and given a grade of 0 with Markbot Server.
Lock the requirements right at the end to make sure everything is exactly how you want it to be.
How the students use it
The students will fork repos then drop into Markbot which will automate the marking.
All the tests are set up and ready to go and inside the Markbot application. They can be configured from a .markbot.yml file.
Place the .markbot.yml file in the folder you want to test. Normally this is done when setting up a repository on GitHub that students would fork.
Here are the properties that you can use in the Markbot file for testing:
repo — used as an indicator in the app screen, for liveWebsite, & as part of the automatic grade submission
canvasCourse — used as part of the Canvas integration. This option will be deprecated in the future but is currently used as a trigger for submissions to Progressinator.
namingIgnore — an array of paths that allows certain filenames to bypass the naming conventions check.
commits — the minimum number of commits students need—will automatically subtract your commits.
liveWebsite — whether to make a HEAD request to the GitHub URL to check that it’s accessible or not. Requires the repo entry. If the repo isn’t set up with gh-pages or the student hasn’t synced any commits a 404 will be issued, failing the test.
repo: markbotcanvasCourse: web-dev-1naming: truecommits: 3liveWebsite: truerestrictFileTypes: true# Other tests, described below, would go here
Git & GitHub checks
Using the git entry we can enforce some requirements on the status of the student’s Git repo.
This is a replacement for the simple commits entry.
git:
# The minimum number of commits students need—will automatically subtract your commits.numCommits: 2# Force the students to make sure all their files are committed.allCommitted: true# Force the students to make sure all their files are pushed & synced.allSynced: true# Confirm specific best practices on the last 5 Git commit messages.# Won’t prevent students from handing assignments in will only show warnings.# (Spelling & grammar, minimum word & character length, no trailing periods, attempts to enforce present-tense imperative verbs at the start)bestPractices: true
HTML file tests
Use the html entry to test HTML files, it’s an array of objects, each representing a file to test.
The path option is the only one that’s required—leaving any of the others off will skip the test.
html:
# The HTML file’s path
- path: 'index.html'# Whether the code in this file should be locked or not, to help prevent students from changing the code# I use it for assignments where I give them complete HTML & they just write the CSS or JS# With locked on, there isn’t much point providing the rest of the optionslocked: true# Whether to validate it or notvalid: true# Check its best practices & indentation (double quoting attributes, having a <title>, indented children, etc.)# Can be further configured in the `htmlcs.json` file# Will be skipped if validation isn’t also checked—the document must be valid firstbestPractices: true# Check if the headings are in the proper order and that the document starts with an <h1># Will be skipped if validation isn’t also checked—the document must be valid firstoutline: true# Run accessibility tests on the HTML documents using AxeCore# It’s usually more convenient to just inherit the accessibility template which includes more testsaccessibility: true# Can be used to test for specific elements; each entry should be a valid CSS selector# Will be skipped if validation isn’t also checked—the document must be valid first# If given an array, the second argument can be a custom error messagehas:
- 'header nav[role="navigation"]'
- 'main'
- ['header nav li a[class][href*="index.html"]', 'The navigation should be highlighted on this page']# You can emit warnings that won’t prevent students from submitting work using an alternative syntax
- check: 'main'# This could also be `selector: 'main'`message: 'The `main` tag should be included for accessibility reasons'type: 'warning'# You can specify a limit for how many times an element should be inside the HTML code
- check: '[role="banner"]'message: 'The “banner” role is used to define the header of the whole website so there should be only one per page'limit: 1# Can be used to test that specific selectors are not used in the HTML# I would use this for ensuring that `<hr>` tags aren’t used when borders should be or that `<br>` tags aren’t used# Will be skipped if validation isn’t also checked—the document must be valid first# If given an array, the second argument can be a custom error messagehasNot:
- 'br'
- ['hr', 'The `hr` tag should not be used to create borders']# Warnings too!
- selector: 'hr'message: 'The `hr` tag should not be used to create borders'type: 'warning'# Regex searches on the file, for confirming specific content# If given an array, the second argument can be a custom error messagesearch:
- 'Hello World!'
- ['Hello World!', 'Whoa, don’t be so grumpy, say “Hello”']# And warnings!
- regex: 'Hello World!'# (Using `check` instead of `regex` is okay too, so everything can be consistent)message: 'Whoa, don’t be so grumpy, say “Hello”'type: 'warning'# Limits work inside search to prevent content duplicationlimit: 1# Regex searches on the file, for confirming specific content isn’t found# If given an array, the second argument can be a custom error messagesearchNot:
- 'Thing-a-magic'# Warnings too!
- check: 'Thing-a-magic'type: 'warning'# Confirm that the code file has less than or equal to this many linesmaxLines: 4
CSS file tests
Use the css entry to test CSS files, with many of the same options as the HTML.
css:
# The CSS file’s path
- path: 'css/main.css'# Whether the code in this file should be locked or not, to help prevent students from changing the code# I use it for assignments where I give them complete CSS & they just write the HTML or JS# With locked on, there isn’t much point providing the rest of the optionslocked: true# Whether to validate it or notvalid: true# Check its best practices & indentation (spaces after colons, new lines after closing blocks, etc.)# Can be further configured in the `stylelint.json` file# Will be skipped if validation isn’t also checked—the document must be valid firstbestPractices: true# Can be used to test for specific selectors, properties & values# [selector, property (optional), value (optional)]# Will be skipped if validation isn’t also checked—the document must be valid firsthas:
- ['.thing']
- ['.super', 'background-image']
- ['.thang', 'width', '50px']# Starting the array with an `@` and a matching string will look inside media queries
- ['@38em', 'html', 'font-size', '110%']# Adding another argument at the end will be a custom error message
- ['html', 'font-size', '100%', 'The `font-size` should always be `100%`']
- ['@38em', 'html', 'font-size', '110%', 'The `font-size` should always increase at `38em`']# You can include all that same complexity with warnings
- check: ['@38em', 'html', 'font-size', '110%', 'The `font-size` should always increase at `38em`']type: 'warning'# Or a little cleaned-up version, can be used with or without warnings
- mediaQuery: '@38em'selector: 'html'property: 'font-size'value: '110%'message: 'The `font-size` should always increase at `38em`'type: 'warning'# Can be used to test that specific selectors do not contain certain properties# I would use this for ensuring as little CSS duplication as possible, like forcing students to use multiple classes# [selector, [property, property, etc.]]# Will be skipped if validation isn’t also checked—the document must be valid firsthasNot:
- ['.btn-ghost', ['display']]
- ['.btn-subtle', ['font-size', 'text-decoration']]# Starting the array with an `@` and a matching string will look inside media queries
- ['@110em']# Adding another argument at the end will be a custom error message
- ['.btn-subtle', ['font-size', 'text-decoration'], 'The `.btn-subtle` shouldn’t be used']
- ['@110em', '.btn-subtle', ['font-size', 'text-decoration'], 'The `.btn-subtle` shouldn’t be used']# Also with warnings!
- check: ['.btn-ghost', ['display']]type: 'warning'# Regex searches on the file# If given an array, the second argument can be a custom error messagesearch:
- '@keyframes'
- ['@viewport', 'The `@viewport` should be included for the best browser compatibility']# Warnings—woot!
- check: '@keyframes'type: 'warning'# Limits work inside search to prevent content duplicationlimit: 1# Regex searches on the file for confirming certain things don’t exist# If given an array, the second argument can be a custom error messagesearchNot:
- ['@media.+\(.*max-width', 'Media queries with `max-width` should not be used — use `min-width` instead']
- ['@media.+\(.*px', 'Pixel units should not be used in media queries — use `em` instead']
- ['font-size\s*:\s*.+px', 'Pixel units should not be used for `font-size` — use `rem` instead']# Using the object syntax and `type` there can also be warning messages
- check: 'font-size\s*:\s*.+px'message: 'Pixel units should not be used for `font-size` — use `rem` instead'type: 'warning'# Confirm that the code file has less than or equal to this many linesmaxLines: 4
Javascript file tests
Use the js entry to test Javascript files.
js:
# The JS file’s path
- path: 'js/main.js'# Whether the code in this file should be locked or not, to help prevent students from changing the code# I use it for assignments where I give them complete JS & they just write the HTML or CSS# With locked on, there isn’t much point providing the rest of the optionslocked: true# Whether to validate/lint it or not using a series of best practices# Can be further configured in the `validation/eslint.json` filevalid: true# Check its best practices & indentation (semicolons, spacing around brackets, etc.)# Can be further configured in the `best-practices/eslint.json` file# Will be skipped if validation isn’t also checked—the document must be valid before best practices are testedbestPractices: true# Regex searches on the filesearch:
- 'querySelector'
- 'addEventListener'# Using a slightly different syntax you can create warnings that don’t prevent the user from submitting
- check: 'querySelectorAll'type: 'warning'# Limits work inside search to prevent content duplicationlimit: 1# Regex searches on the file for confirming certain things don’t exist# If given an array, the second argument can be a custom error messagesearchNot:
- 'document.write\('
- ['console.log\(', 'The `console.log()` function should not be left in your code after you’ve finished debugging']# Warnings work too!
- check: 'console.log\('message: 'The `console.log()` function should not be left in your code after you’ve finished debugging'type: 'warning'# Confirm that the code file has less than or equal to this many linesmaxLines: 4
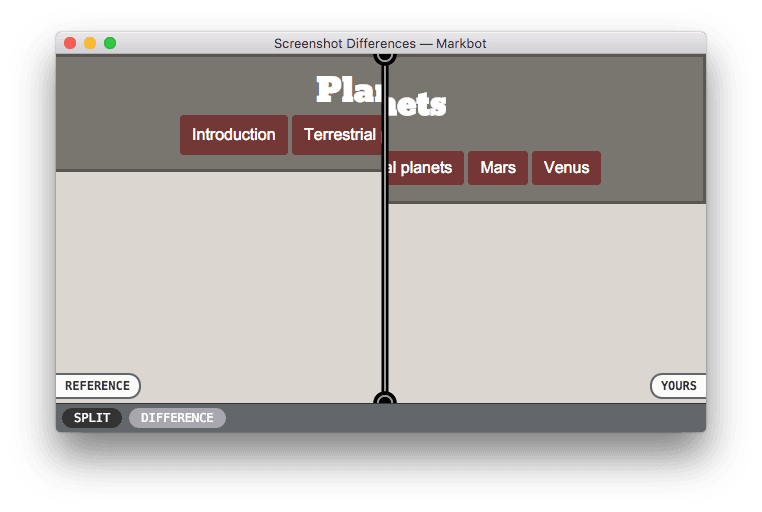
Screenshot comparisons
Markbot can be used to compare student work against reference screenshots included in the repository.
screenshots:
# The path to the HTML file that will be screenshot
- path: 'index.html'# An array of different screen widths for taking screenshotssizes: [400, 650, 960]# OR: use the alternative object syntax to control the allowed percentage for each screenshot# This will bypass the default percentages (see below)# The syntax is `screenshot-width: allowed-difference-percentage`sizes:
400: 10650: 10960: 8# If you’d like to capture the printed version of the website, send `print` as one of the sizessizes: ['print']# If there are multiple screenshots of the same path the label is required to distinguish them (it’s used in the filenames)# It can also be used to add a little extra information to the check listlabel: 'Clicked'# By default animations & transitions are generally disabled using the * selector and !important# This will allow you to enable them again# Be careful to wait for them to complete before taking a screenshot# Something like: on('.elem', 'animationend', done);allowAnimations: true# Execute some Javascript before capturing the screenshots# Happens immediately, before the first screenshot is taken and is not repeated for each size# Has access to all the same functions as the `functionality` tests with a few small exceptions:# - `pass()` & `fail()` don’t exist# - `done()` must be called when the screenshot capturing should beginbefore: | on('.btn', 'transitionend', () => { done(); }); activate('.btn');
Markbot will look in the screenshots folder for images to compare against.
The screenshots should be generated using Markbot itself for the most consistency—trigger the “Develop” menu (See Environment variables) and press “Generate Reference Screenshots”.
Markbot will display differences to students highlighted in a black & white difference image. Difference percentages are calculated and anything with a difference greater than 10%–13% is considered an error.
The difference percentage is calculated based on the area of the image, following this formula:
The difference percentage is a sliding scale because as the screenshot area increased the percentage must go down to maintain a similar level of strictness.
An example of screenshot difference errors.
Students can enlarge the difference screenshot into a split view window for clearer understanding.
Markbot split view screenshot comparison tool.
Functionality tests
Markbot has the ability to run arbitrary Javascript code against an HTML file. This is great for running integration and functionality tests on student code to make sure their Javascript is doing the right thing.
Use the functionality entry in the .markbot.yml file to add tests for HTML files.
Each entry in the functionality list will perform the following actions:
The path will be loaded into a hidden browser window
When the website has finished loading the testing will start
Markbut will run through every entry in the tests array
Each Javascript test will be run inside a function that gets injected into the fully loaded page
If the test calls the pass() function, then the test passes, otherwise it should call the fail() function with a string describing the problem
If a single test doesn’t pass the remainder of the tests will not execute.
Here’s an example from one of my assignments:
functionality:
# The path to the HTML file to load in a hidden browser window
- path: "index.html"# The label can be used to help distinguish tests in the check list — it’s completely optional# When you need a full refresh of the page, including another test with the same path makes sense# But then they’re all listed the same in the check list# Label gives you the ability to slightly distinguish the test nameslabel: "Dinosaur link"# A replacement for individual tests# Will just confirm that there are no Javascript errorsnoErrors: true# This Javascript code will be injected into the page before it loads# The feature exists mainly so I can overwrite built-in features like `prompt()` to test user inputsetup: | window.prompt = function () { return 'a'; }# An array of Javascript code pieces to run against the live websitetests:
- | let ball = $('.ball'); let currentColour = css(ball).backgroundColor; $('input[type="color"]').value = '#ffee66'; $('form').dispatchEvent(ev('change')); if (currentColour == css(ball).backgroundColor) fail('The ball’s colour doesn’t change'); pass();
Each test entry will be embedded into a Javascript anonymous self-executing function with a try-catch block, like this:
(function(){'use strict';try{eval("(function(){'use strict';/* Your test code will be embedded here */}())");}catch(e){/* Show error messages in Markbot & console */}}());
Yes, eval is evil, etc. But it’s useful here to catch any syntax errors you may have in your code so they can be displayed in the debugging console.
Also notice that your test code will be wrapped in a self-executing function, this allows you to use return to short-circuit functions when they fail or pass.
Your injected code will have access to a few functions to simplify what you have to write:
pass() — Tell Markbot that this test has passed
fail(reason) — Tell Markbot that this test has failed
The reason should be a string that will be shown to the user in Markbot’s error list
debug(...args) — For when writing the tests, to help you debug your test code
What ever is passed into debug() will be written to the console
$(selector[, target = document]) — Instead of having to write document.querySelector()
The target parameter allows you to use querySelector() on elements other than document—but defaults to document
If the selector isn’t found on the page the test will fail with an error message
$$(selector[, target = document]) — Instead of having to write document.querySelectorAll()
The target parameter allows you to use querySelectorAll() on elements other than document—but defaults to document
If the selector isn’t found on the page the test will fail with an error message
css(element) — A shortcut to getComputedStyle()
bounds(element) — A shortcut to getBoundingClientRect()
offset(element) — Returns the complete offset for the element to the top and left of the page, using getBoundingClientRect() + scrollY/X for the calculation.
Returns an object in the format:
{left: 0,top: 0,}
on(selector/element, eventname, callback[, timeoutlength = 2000]) — This is instead of using addEventListener. The problem with addEventListener is timing.
If the student’s code uses event delegation, but yours listens directly on the element, your listener will be fired first.
Using on() will always bind to the document and listen for the event to bubble back upwards—guaranteeing that your listener gets called second.
selector/element a pre-selected DOM element object or CSS selector to match for the target for your event.
eventname is any standard event like click, animationend, etc.
callback is a function that will be executed when the event is triggered. It will receive two arguments:
hasError — (bool): whether or not the timeout was executed, meaning the event was never triggered. Set to true when there is an error and false otherwise.
ev — the standard Javascript event object passed through.
timeoutlength is an optional argument you can pass to control the maximum length the listener will wait to be called.
ev(eventString[, options]) — Can be used to fire an event with dispatchEvent()
It creates a new Event, new MouseEvent or new KeyboardEvent
options has a default of: {bubbles: true, cancelable: true}
If you provide an options argument it will be merged with the defaults
hover(selector/element, callback) — A specialized event dispatch that hovers the mouse over an element—regular JS events aren’t “trusted” and therefore won’t trigger the CSS :hover styles.
Allows for testing to make sure student’s apply hover states to elements in CSS.
selector/element a pre-selected DOM element object or the CSS selector of the target for your event.
callback is a function that will be executed when the hover has triggered.
activate(selector/element, callback) — A specialized event dispatch that “activates” an element triggering the CSS :active styles.
Allows for testing to make sure student’s apply active states to elements in CSS.
selector/element a pre-selected DOM element object or the CSS selector of the target for your event.
callback is a function that will be executed when the hover has triggered.
send(eventname[, options[, callback]]) — sends trusted input events to the browser window. This is what hover() and activate() do internally.
It’s essentially a wrapper around Electron’s webContents.sendInputEvent()—See the Electron docs.
eventname is one of Electron’s allowed events: mouseDown, mouseUp, mouseEnter, mouseLeave, contextMenu, mouseWheel, mouseMove, keyDown, keyUp, char
options allows you to set extra properties, like Electron’s modifiers. But most importantly it sets the isTrusted flag to true by default to allow hover, etc. activate the CSS changes.
Here’s an example of using ev() and on():
functionality:
- path: 'index.html'tests:
- | let btn = $('.btn'); let btnFill = $('path:nth-child(2)', btn); on('.btn path:nth-child(2)', 'transitionend', function (err, ev) { if (err) fail('The transition on the button’s coloured setion never ends—check that is has a transition'); if (oldBtnFill == css(btnFill).fill) fail('The button doesn’t change colour'); pass(); }); btn.dispatchEvent(ev('click'));
Here’s an example of using hover():
functionality:
- path: 'index.html'tests:
- | let a = document.querySelector('a'); let oldBg = css(a).backgroundColor; hover('a', function () { if (css(a).backgroundColor == oldBg) fail('The hover colour doesn’t change on the link'); pass(); });
Markdown tests
Markbot can check Markdown files looking for validation & best practices. It can also search inside the files for specific content.
If the Markdown files have YAML front matter that will also be validated with the same processor used by the YAML file checking.
The path option is the only one that’s required—leaving any of the others off will skip the test.
md:
# The file’s path
- path: "README.md"# Check validation & best practices following a specific Markdown formatvalid: true# Regex searches on the file, for confirming specific content# If given an array, the second argument can be a custom error messagesearch:
- 'Dinosaurs'
- ['T\. Rex', 'Expected to see the T. Rex described']# Warnings will work too!# And so do limits!# Regex searches on the file, for confirming specific content isn’t found# If given an array, the second argument can be a custom error messagesearchNot:
- 'Mammals'# Warnings will work too!
YAML tests
Markbot can check YAML files looking for validation & best practices. It can also search inside the files for specific content.
The path option is the only one that’s required—leaving any of the others off will skip the test.
yml:
# The file’s path
- path: "data.yml"# Check validation & best practicesvalid: true# Regex searches on the file, for confirming specific content# If given an array, the second argument can be a custom error messagesearch:
- 'Mammals'
- ['Dimetrodon', 'Should have explained that the Dimetrodon isn’t a dinosaur']# Warnings will work too!# And so do limits!# Regex searches on the file, for confirming specific content isn’t found# If given an array, the second argument can be a custom error messagesearchNot:
- 'Dinosaurs'# Warnings will work too!
File & image tests
Markbot can check random plain text files and images for specific features.
Images (.jpg, .png): compare dimensions, compare file size, check if metadata has been removed by smushing.
Text files: compare file size, check if it’s empty, search/not with regexes, check for smushing with removal of line-breaks.
Favicons (.ico): — Favicons can be checked but they won’t be checked for smushing or dimensions—Markbot always enforces 16 & 32 pixels sizes in favicons.
SVG (.svg) — SVG are treated as hybrids: dimensions can be checked even though they’re technically text files (Markbot will look at the width, height, and viewBox attributes) and smushing only checks for line breaks.
Use the files entry to test images and text files, it’s an array of objects, each representing a file to test.
The path option is the only one that’s required—leaving any of the others off will skip the test.
files:
# The file’s path
- path: "images/mars-2.jpg"# Essentially checks to make sure the file doesn’t exist# All other checks will be ignoredexists: false# The maximum allowed file size represented in kilobytes (kB)maxSize: 300# For images only# The maximum/minimum allowed widthmaxWidth: 3000minWidth: 320# For images only# The maximum/minimum allowed heightmaxHeight: 1500minHeight: 240# Check if the image/file has been smushed# For images it’ll look for extraneous metadata, something ImageOptim would remove# For text files & SVGs it’ll just look for line breakssmushed: true# For text files only# Regex searches on the file, for confirming specific content# If given an array, the second argument can be a custom error messagesearch:
- '^Sitemap\:.+sitemap\.xml\s+?$'# Warnings will work too!# And so do limits!# For text files only# Regex searches on the file, for confirming specific content isn’t found# If given an array, the second argument can be a custom error messagesearchNot:
- 'Allow:'
- ['Disallow\:\s*\/', 'The disallow all directive (`Disallow: /`) should not be used']# Warnings will work too!# OR…# Just pass a directory & rely on the `allFiles` directive described below
- directory: "images"
Performance testing
Markbot can check the performance of a website on simulated networks—or without network throttling. Markbot will check specific performance statistics and compare them to a performance budget.
The path option is the only one that’s required. If only the path is included the default performance budget will be used.
performance:
# The path to an HTML file to load and test
- path: 'index.html'# The network speed (see list below)speed: 'WIFI'budget:
# Milliseconds for maximum load timemaxLoadTime: 1000# Maximum number of assetsmaxRequests: 15# Maximum page size of all assets in kilobytes (kB)maxSize: 800# Maximum number of fonts allowed on the pagemaxFonts: 5
Simulated networks speeds
Markbot has a few simulated network speeds built in—you can see all the details of in the app/networks.js file.
WIFI-FAST
WIFI-REGULAR (WIFI)
DSL
4G-REGULAR (4G)
3G-GOOD (3G)
3G-REGULAR
2G-GOOD (2G)
2G-REGULAR
GPRS
The names in the brackets are shortcuts: using speed: '4G' is exactly the same as speed: '4G-REGULAR'.
Default performance budget
Here’s the default performance budget that Markbot will use if you don’t specify your own. If you leave one of the performance budget options off, Markbot will add the missing properties from the default budget.
If you want the same values to work for all files of the same type in a project you can use the allFiles entry. With the all files entry we can set defaults that would be applied to all the selected files.
allFiles:
# Supports any of the entries that `html` supportshtml:
valid: truebestPractices: trueoutline: trueperformance: truehas:
- 'h1'# There’s also a screenshots entry to take screenshots for all HTML files specified# Creates a `screentshots.path` entry for each HTML filescreenshots: [320, 400, 608, 960, 1440]# You can add the `except` entry to all types to prevent all these defaults from applying to specific filesexcept:
- 'test.html'# Supports any of the entries that `css` supportscss:
valid: true# Supports any of the entries that `js` supportsjs:
valid: true# Supports any of the entries that `md` supportsmd:
valid: true# Supports any of the entries that `yml` supportsyml:
valid: true# The functionality tests will be applied to every HTML file# Supports any of the entries that `functionality` supportsfunctionality:
noErrors: true# Supports any of the entries that `files` supportsfiles:
maxWidth: 2500maxHeight: 2500maxSize: 300smushed: true# Supports any of the entries that `performance` supportsperformance:
speed: '3G'html:
- path: index.html
- path: about.htmlhas:
- 'h2'files:
- path: 'images/dino.jpg'performance:
- path: 'index.html'
With this setup everything from the allFiles->html entry would be applied to all the HTML files listed below—to help alleviate duplication.
Adding functionality into the allFiles entry will test that functionality on every HTML file listed in the html entry.
Unique information for all files
With the allFiles entry, for HTML, we can check for uniqueness between the files: e.g. unique <title> tags or unique meta description tags.
allFiles:
html:
unique:
- 'title'# Using an array, the second item will be used in the error message as the description# I use this to make the error messages a little simpler to understand# Without the second entry, the error message will just write the selector
- ['meta[name="description"][content]', 'meta description']
- 'h1'
The above set up would force all the HTML files to have different title tags, meta descriptions and <h1> tags.
The unique entry expects each item to be a valid CSS selector, similar to has & hasNot.
If you want to check attribute content, select with the attribute selector. Markbot will grab the last selected attribute and compare its content. In the example above, Markbot is comparing the content attribute.
Inheriting from templates
Markbot has a bunch of templates inside the templates folder that your Markbot files can inherit from, thereby getting all the requirements specified in that file. Your Markbot file is more powerful and will overwrite entries—but things like has, search, etc. will be merged together.
The templates are just standard Markbot files, with all the same properties.
To inherit from the built-in templates add an inherit property to your Markbot file—it’s a list of all the templates to use:
In the above scenario, everything from the all those templates will be applied to your Markbot file (overwrites based on order) and therefore to the index.html file.
The Markbot ignore file
You can get Markbot to ignore files within your project directory when using the allFiles option. Include a .markbotignore file in the same location as your .markbot.yml and it’ll be loaded in.
It doesn’t support glob patterns only simple file and folder paths.
Here’s an example:
pattern-library.html
patterns/typography       # Since this is a directory everything within would be ignored
patterns/grid
patterns/brand
patterns/icons
patterns/modules
common/grid.css
common/type.css
common/modules.css
Installation on student computers
Before getting Markbot working on student machines, these two things should be downloaded and installed on the user’s computer.
Git
Use the Mac OS X Terminal and install the command line tools with xcode-select --install
On Windows, install Git directly from the website. When installing, on the “Adjusting your PATH environment” screen, switch to “Use Git from the Windows Command Prompt”.
JDK
Because Markbot shells out to two JAR files, the JDK must be available on the user’s computer.
These will allow you to enable the “Develop” menu on your computer and create locking hashes for screenshots, code files, and the .markbot.yml file itself.
To configure your installation of Markbot you’ll need to adjust the config file.
Rename config.example.json to just config.json and change the following options:
ignoreCommitEmails — (array) the list of email addresses to ignore when counting commits.
You should probably leave this setting alone unless you choose to host your own copy of Learn the Web’s Progressinator.
progressinatorApi — (string) the URL to the Progressinator instance hosted on Learn the Web.
3. Passcode hashing & embedding
After you’ve created your config.json file and created the two environment variables, run the following command: npm run hash-passcode.
The hash-passcode script will generate a secret key and hash your password, embedding both into your config.json.
The hashed passcode isn’t really for security, it only uses HMAC-SHA512. The purpose is really to be sufficiently annoying that students will do their work instead of figuring out how to cheat Markbot.
Don’t forget to copy this hashed passcode into Progressinator.
4. HTTPS certificate generation
Markbot spins up a web server internally to help with performance testing and website loading. The web server uses HTTPS—though it is just a self-signed certificate. The private key and public certificate need to be generated with openssl before Markbot can work.
In your terminal run:
npm run gen-https-cert
The script will create the appropriate files and place them into the app directory.
While Markbot is running the tested website will be available at https://127.0.0.1:PORT with a randomly assigned port number.
5. Markbot dependencies
Markbot has a few external dependencies that it shells out to internally:
Git
Nu HTML validator (JAR)
CSS validator (JAR)
LanguageTool (JAR)
The vendor folder should contain a bunch of JAR files for the HTML validator, the CSS validator and LanguageTool.
HTML validator
The vendor/html-validator folder should contain the vnu.jar—the pre-built binary works well.
(Further down the page, look for: “Stand-alone for the Desktop”)
Copy the following items into the vendor/languagetool folder:
languagetool-commandline.jar
libs/
META-INF/
org/
Add more words to the dictionary
Find the English dictionary, here:
org/languagetool/resource/en/hunspell/ignore.txt
Copy all the text from words-to-add.txt (it’s inside the vendor folder) into the bottom of ignore.txt
Make sure there are no blank lines between the words.
PDFBox
The PDFBox application is used primarily for checking screenshots of printed versions of websites—used to convert printed PDFs into PNGs for comparison. It’s another Java JAR to install in the vendor folder.
Go here and download the “Command line tools” pdfbox-app-0.0.0.jar package:
elm-3d-scene is a high-level Elm package for producing 3D graphics, with
support for lighting, shadows and realistic materials:
It aims to make creating 3D graphics as easy and enjoyable as possible, without
having to worry about low-level details like shader programs and transformation
matrices. elm-3d-scene uses elm-explorations/webgl
under the hood (and therefore requires WebGL support
to work), but no knowledge of WebGL is required to use this package.
Any questions/feedback, please open an issue or please reach out in the
#webgl channel or to @ianmackenzie on the Elm Slack!
However, if you’re a WebGL guru who’s comfortable with writing their own shader
programs, then elm-3d-scene might not (yet?) be for you – you’re currently
limited to the material and lighting types that elm-3d-scene supports
directly. Eventually elm-3d-scene will likely support custom shaders in some
way (see the roadmap), but it’s not there yet.
Getting started
The best way to start learning the elm-3d-scene API is by reading through the
tutorial
and then checking out the examples.
For more details on any type/function, the reference documentation
is your friend.
One important point to understand is that elm-3d-scene builds heavily on
several other packages, making extensive use of types and modules from:
ianmackenzie/elm-geometry:
Point3d, Vector3d, Direction3d, LineSegment3d, Triangle3d,
Sphere3d, Block3d, Axis3d…basically anything ending in 3d other
than Camera3d and Viewpoint3d =)
As a result, to start using elm-3d-scene in your own project you will need at
least a decent understanding of those packages as well. Check out their READMEs
and reference documentation for details, but you can probably get a decent sense
of how they work by checking out the elm-3d-scene examples.
When installing elm-3d-scene, you’ll also want to install the above packages:
elm install ianmackenzie/elm-3d-scene
elm install avh4/elm-color
elm install ianmackenzie/elm-3d-camera
elm install ianmackenzie/elm-units
elm install ianmackenzie/elm-triangular-mesh
elm install ianmackenzie/elm-geometry
(All of the packages will get downloaded and installed automatically anyways,
since they’re dependencies of elm-3d-scene, but you’ll need to install them
explicitly in your own project so that you can use them directly.)
Climate action
I would like for the projects I work on to be as helpful as possible in
addressing the climate crisis. If
you are working on a project that helps address the climate crisis (clean
energy, public transit, reforestation, sustainable agriculture etc.) either as
an individual, as part of an non-profit organization or even as part of a
for-profit company, and
there is a new feature you would find helpful for that work (or a bug you need
fixed) in any of my open-source projects, then
please open a new issue,
describe briefly what you’re working on and I will treat that issue as high
priority.
Roadmap
elm-3d-scene has a decent number of features already, but there are many, many
more to add. Check out the issues
to get a sense of what features are planned (and add your own feature request if
there’s something you’d like to see!), but some of the immediate next steps will
likely include:
Support for loading different model formats
such as glTF and OBJ (likely in separate packages designed to work nicely with
elm-3d-scene, instead of being part of elm-3d-scene itself)
Support for normal and ambient occlusion mapping (already mostly implemented
internally)
Custom vertex and/or fragment shaders (for things like custom procedural
texturing, fancy material types or deformable meshes)
Skeletal animation (rigging/skinning)
However, these will require some significant API design and implementation work.
Contributing
Contributions are very welcome! Here are some ideas for some that would be very
useful at this stage:
More examples to add to the examples directory, showing how to create
specific kinds of scenes or how to integrate elm-3d-scene with other
packages, such as:
An example combining elm-3d-scene and elm-gamepad,
perhaps using the gamepad to walk around a scene
An example with shadows cast from a moving light source (I think something
like a point light flying in and amongst a bunch of cubes could look pretty
cool)
Anything you think would look cool/illustrate part of the API missed by
other examples/help others understand something you struggled with
Separate packages that parse different 3D model formats so they can be loaded
into elm-3d-scene, such as OBJ,
STL or DAE.
I think it makes sense for each file format to have a dedicated package
separate from elm-3d-scene. Ideally, I think each package should focus on
simply parsing a file into a nice Elm data structure (instead of directly into
an elm-3d-sceneEntity, for example) so that the data could also be used
in other ways (custom rendering engines, 3D printing, analysis etc.).
Note that some work has already started on GLTF
loading, so reach out to me (@ianmackenzie) on the Elm Slack
if that’s something you’re interested in working on.
Once the internals of elm-3d-scene stabilize a bit, there will be lots more
opportunities to contribute to the core rendering engine, to add features such
as:
This repository serves as a comprehensive template for building Flutter applications following best practices in software architecture and development methodologies. It incorporates the following key components:
Domain-Driven Design (DDD) Architecture: The project is structured around the principles of DDD, promoting a clear separation of concerns and a focus on domain logic.
Test-Driven Development (TDD) Architecture: Test cases are written before the implementation to ensure code correctness and reliability. TDD is embraced throughout the development process.
BLoC State Management: Business Logic Component (BLoC) pattern is utilized for managing application state, providing a robust and scalable solution for handling complex state management scenarios.
Provider State Management: In addition to BLoC, Provider pattern is also employed for state management, offering flexibility and simplicity where it fits best.
Dependency Injection: The project integrates dependency injection to facilitate loose coupling and improve testability by enabling easier mocking of dependencies.
Router: A navigation router is implemented to manage navigation flow within the application, ensuring a consistent and structured user experience.
Project Structure:
clean-architecture-tdd-flutter-template/
│
├── lib/                                  # Main source code directory
│   ├── core/                             # Core domain logic and utilities
|   |   ├── common/                       # Common utilities and shared components
|   |   |   ├── app/                      # Application-specific components and providers
|   |   |   |   └── providers/            # Providers for State Management
|   |   |   ├── views/                    # Reusable UI components
|   |   |   └── widgets/                  # Generic widgets
|   |   ├── enums/                        # Enumerations used in the domain
|   |   ├── errors/                       # Error handling and exception classes
|   |   ├── extensions/                   # Extension methods for built-in Dart types
|   |   ├── res/                          # Resource files such as images or fonts
|   |   ├── services/                     # External services and infrastructure dependencies
|   |   |   ├── injection_container.dart  # Dependency injection setup
|   |   |   └── router.dart               # Routing configuration
|   |   ├── usecase/                      # Use cases type representing business logic
|   |   └── utils/                        # Utility functions and helpers
│   ├── src/                              # Feature-specific code
|   |   └── example_feature/              # Example feature module
|   |       ├── data/                     # Data layer components
|   |       |   ├── datasources/          # Data sources (e.g., APIs, databases)
|   |       |   ├── models/               # Data models and mappers
|   |       |   └── repository_impl/      # Implementations of data repositories
|   |       ├── domain/                   # Domain layer components
|   |       |   ├── entities/             # Domain entities representing business concepts
|   |       |   ├── repository/           # Interfaces for data repositories
|   |       |   └── usecases/             # Use cases implementing business logic
|   |       └── presentation/             # Presentation layer components
|   |           ├── bloc/                 # Business Logic Components for state management
|   |           ├── refactors/            # Refactored UI components or business logic
|   |           ├── views/                # Screens or UI components
|   |           └── widgets/              # Reusable widgets specific to the feature
│   └── main.dart                         # Application entry point
│
│
├── test/                                 # Test directory for TDD
│   ├── fixtures/                         # Test fixtures for common setup or mock data
│   └── src/                              # Source code specific tests
|       └── example_feature/              # Example feature module tests
|           ├── data/                     # Data layer tests
|           |   ├── datasources/          # Data source tests
|           |   └── models/               # Data model tests
|           ├── domain/                   # Domain layer tests
|           |   └── usecases/             # Use case tests
|           └── presentation/             # Presentation layer tests
|               └── bloc/                 # BLoC tests
│
├── README.md                             # Project documentation and usage guide
└── pubspec.yaml                          # Flutter project dependencies and metadata
Dashboards are a focused and organized view of your cloud resources in the Azure portal. Use dashboards as a workspace where you can monitor resources and quickly launch tasks for day-to-day operations.
This terrafrom module quickly deploys multiple dashboards in an Azure resource group using json template files for dashboard definitions.
Module Usage
# Azurerm Provider configurationprovider"azurerm" {
features {}
}
module"dashboard" {
source="kumarvna/dashboard/azurerm"version="1.1.0"# By default, this module will not create a resource group. Location will be same as existing RG.# proivde a name to use an existing resource group, specify the existing resource group name, # set the argument to `create_resource_group = true` to create new resrouce group.resource_group_name="rg-shared-westeurope-01"location="westeurope"# Dashboard configurationdashboards=[
{
name ="my-cool-dashboard"
json_file_path ="./test_dashboard.json"
variables = {
"title"="example-dashboard"
}
}
]
# Adding TAG's to your Azure resources tags={
ProjectName ="demo-internal"
Env ="dev"
Owner ="user@example.com"
BusinessUnit ="CORP"
ServiceClass ="Gold"
}
}
dashboards – List of Dashboard definitions
The following settings are available for dashboards object:
Name
Description
name
Specifies the name of the Shared Dashboard. This should be be 64 chars max, only alphanumeric and hyphens (no spaces). For a more friendly display name, add the hidden-title tag
json_file_path
path of the JSON file data representing dashboard body
variables
Variables can be injected as needed for JSON. for example title.
Recommended naming and tagging conventions
Applying tags to your Azure resources, resource groups, and subscriptions to logically organize them into a taxonomy. Each tag consists of a name and a value pair. For example, you can apply the name Environment and the value Production to all the resources in production.
For recommendations on how to implement a tagging strategy, see Resource naming and tagging decision guide.
Important :
Tag names are case-insensitive for operations. A tag with a tag name, regardless of the casing, is updated or retrieved. However, the resource provider might keep the casing you provide for the tag name. You’ll see that casing in cost reports. Tag values are case-sensitive.
An effective naming convention assembles resource names by using important resource information as parts of a resource’s name. For example, using these recommended naming conventions, a public IP resource for a production SharePoint workload is named like this: pip-sharepoint-prod-westus-001.
Requirements
Name
Version
terraform
>= 1.1.9
azurerm
>= 3.28.0
Providers
Name
Version
azurerm
>= 3.28.0
Inputs
Name
Description
Type
Default
create_resource_group
Create new resource group and use it for all networking resources
string
""
resource_group_name
The name of an existing resource group.
string
""
location
The location for all resources while creating a new resource group.
This repository contains the code for the following article:
@article{alves_deep_2018,
      author       = {{Rodrigues Alves, Danny and Giovanni Colavizza and Frédéric Kaplan}},
      title        = {{Deep Reference Mining from Scholarly Literature in the Arts and Humanities}},
      journal      = {{Frontiers in Research Metrics & Analytics}},
      volume       = 3,
      number       = 21,
      year         = 2018,
      doi          = {10.3389/frma.2018.00021}
    }
Task definition
We focus on the task of reference mining, instantiated into three tasks: reference components detection (task 1), reference typology detection (task 2) and reference span detection (task 3).
Sequence: G. Ostrogorsky, History of the Byzantine State, Rutgers University Press, 1986.
Task 1: author author title title title title title publisher publisher publisher year
Example of dataset entry (beginning of validation dataset, first line/sequence): Token Task1tag Task2tag Task3tag`:
-DOCSTART- -X- -X- o

C author b-secondary b-r
. author i-secondary i-r
Agnoletti author i-secondary i-r
, author i-secondary i-r
Treviso title i-secondary i-r
e title i-secondary i-r
le title i-secondary i-r
sue title i-secondary i-r
pievi title i-secondary i-r
. title i-secondary i-r
Illustrazione title i-secondary i-r
storica title i-secondary i-r
, title i-secondary i-r
Treviso publicationplace i-secondary i-r
1898 year i-secondary i-r
, year i-secondary i-r
2 publicationspecifications i-secondary i-r
v publicationspecifications e-secondary i-r
. publicationspecifications e-secondary e-r
Pre-trained word vectors can be downloaded from Zenodo:
FlatDict and FlatterDict are a dict classes that allows for single level,
delimited key/value pair mapping of nested dictionaries. You can interact with
FlatDict and FlatterDict like a normal dictionary and access child
dictionaries as you normally would or with the composite key.
This package attempts to use semantic versioning. API changes are indicated
by the major version, non-breaking improvements by the minor, and bug fixes
in the revision.
It is recommended that you pin your targets to greater or equal to the current
version and less than the next major version.
Installation
$ pip install flatdict
Note that as of 4.0, setuptools 39.2 or higher is required for installation.


 https://github.com/drzamich/shiny_dashboard