Author: h6sdm9fdluld

  • nft-template-in-tact

    NFT Standard in Tact

    Star History Chart!!!

    This GitHub repository is dedicated to an NFT standard (TEP-62), which provides a set of guidelines and specifications for creating and managing non-fungible tokens (NFTs) on blockchain platforms.

    The repository contains a comprehensive collection of code files, documentation, and resources that developers can utilize to implement the standard in their NFT projects. It offers a well-defined structure and functionality for NFT contracts, including features like token metadata, ownership transfers, and token enumeration.

    The repository also includes sample code and examples to help developers understand and implement the NFT standard more easily. Collaborators and contributors actively maintain and update the repository, ensuring it remains up-to-date with the latest advancements and best practices in the NFT ecosystem.

    How to use

    yarn build # To build contract
    yarn test # To run test cases
    yarn deploy # To deploy contract
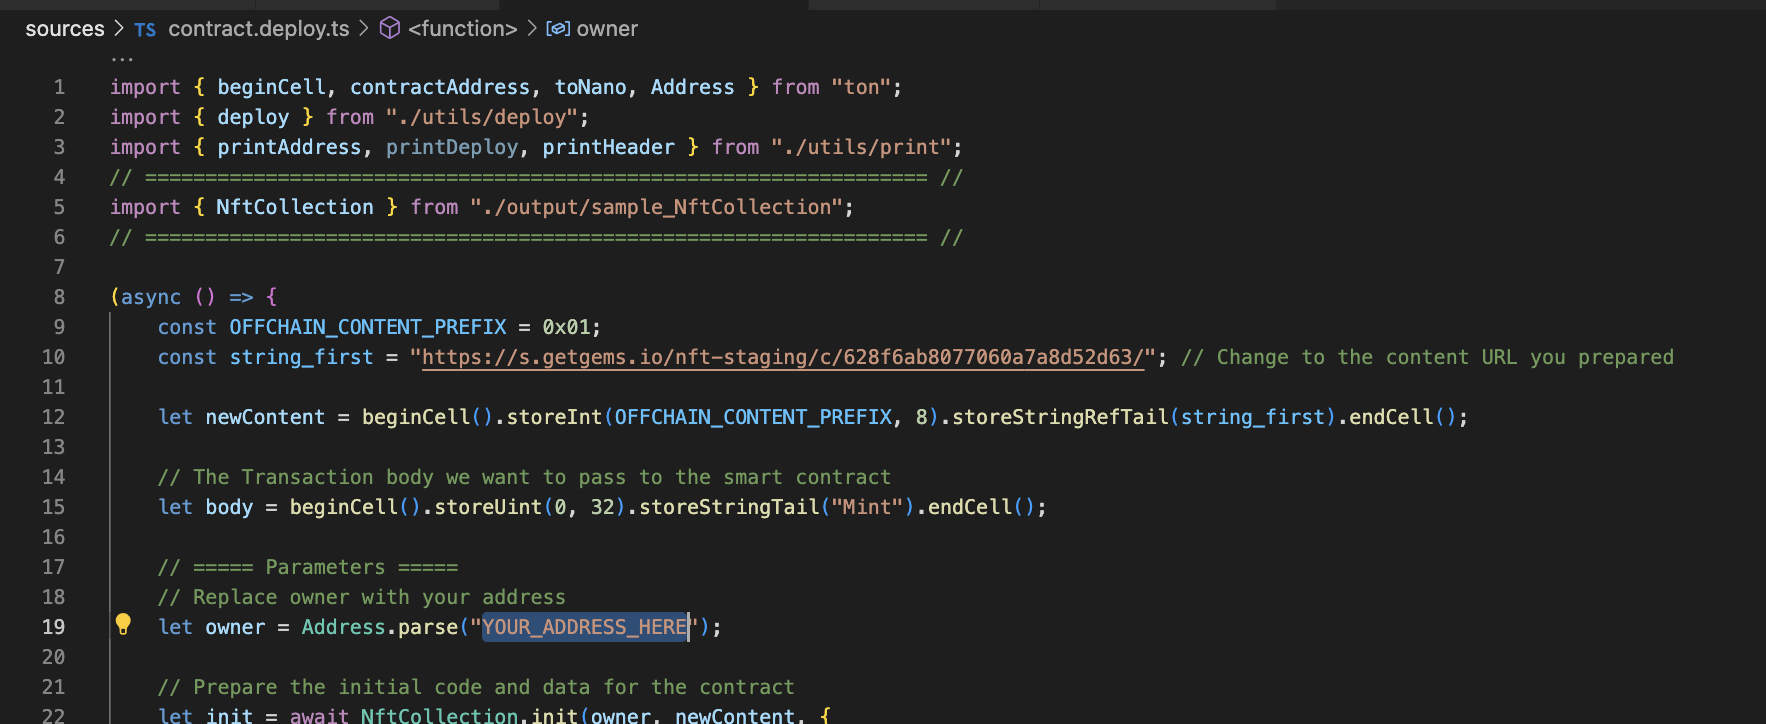
    yarn read # The way to read the smart contract data after your deployed the code

    Warning

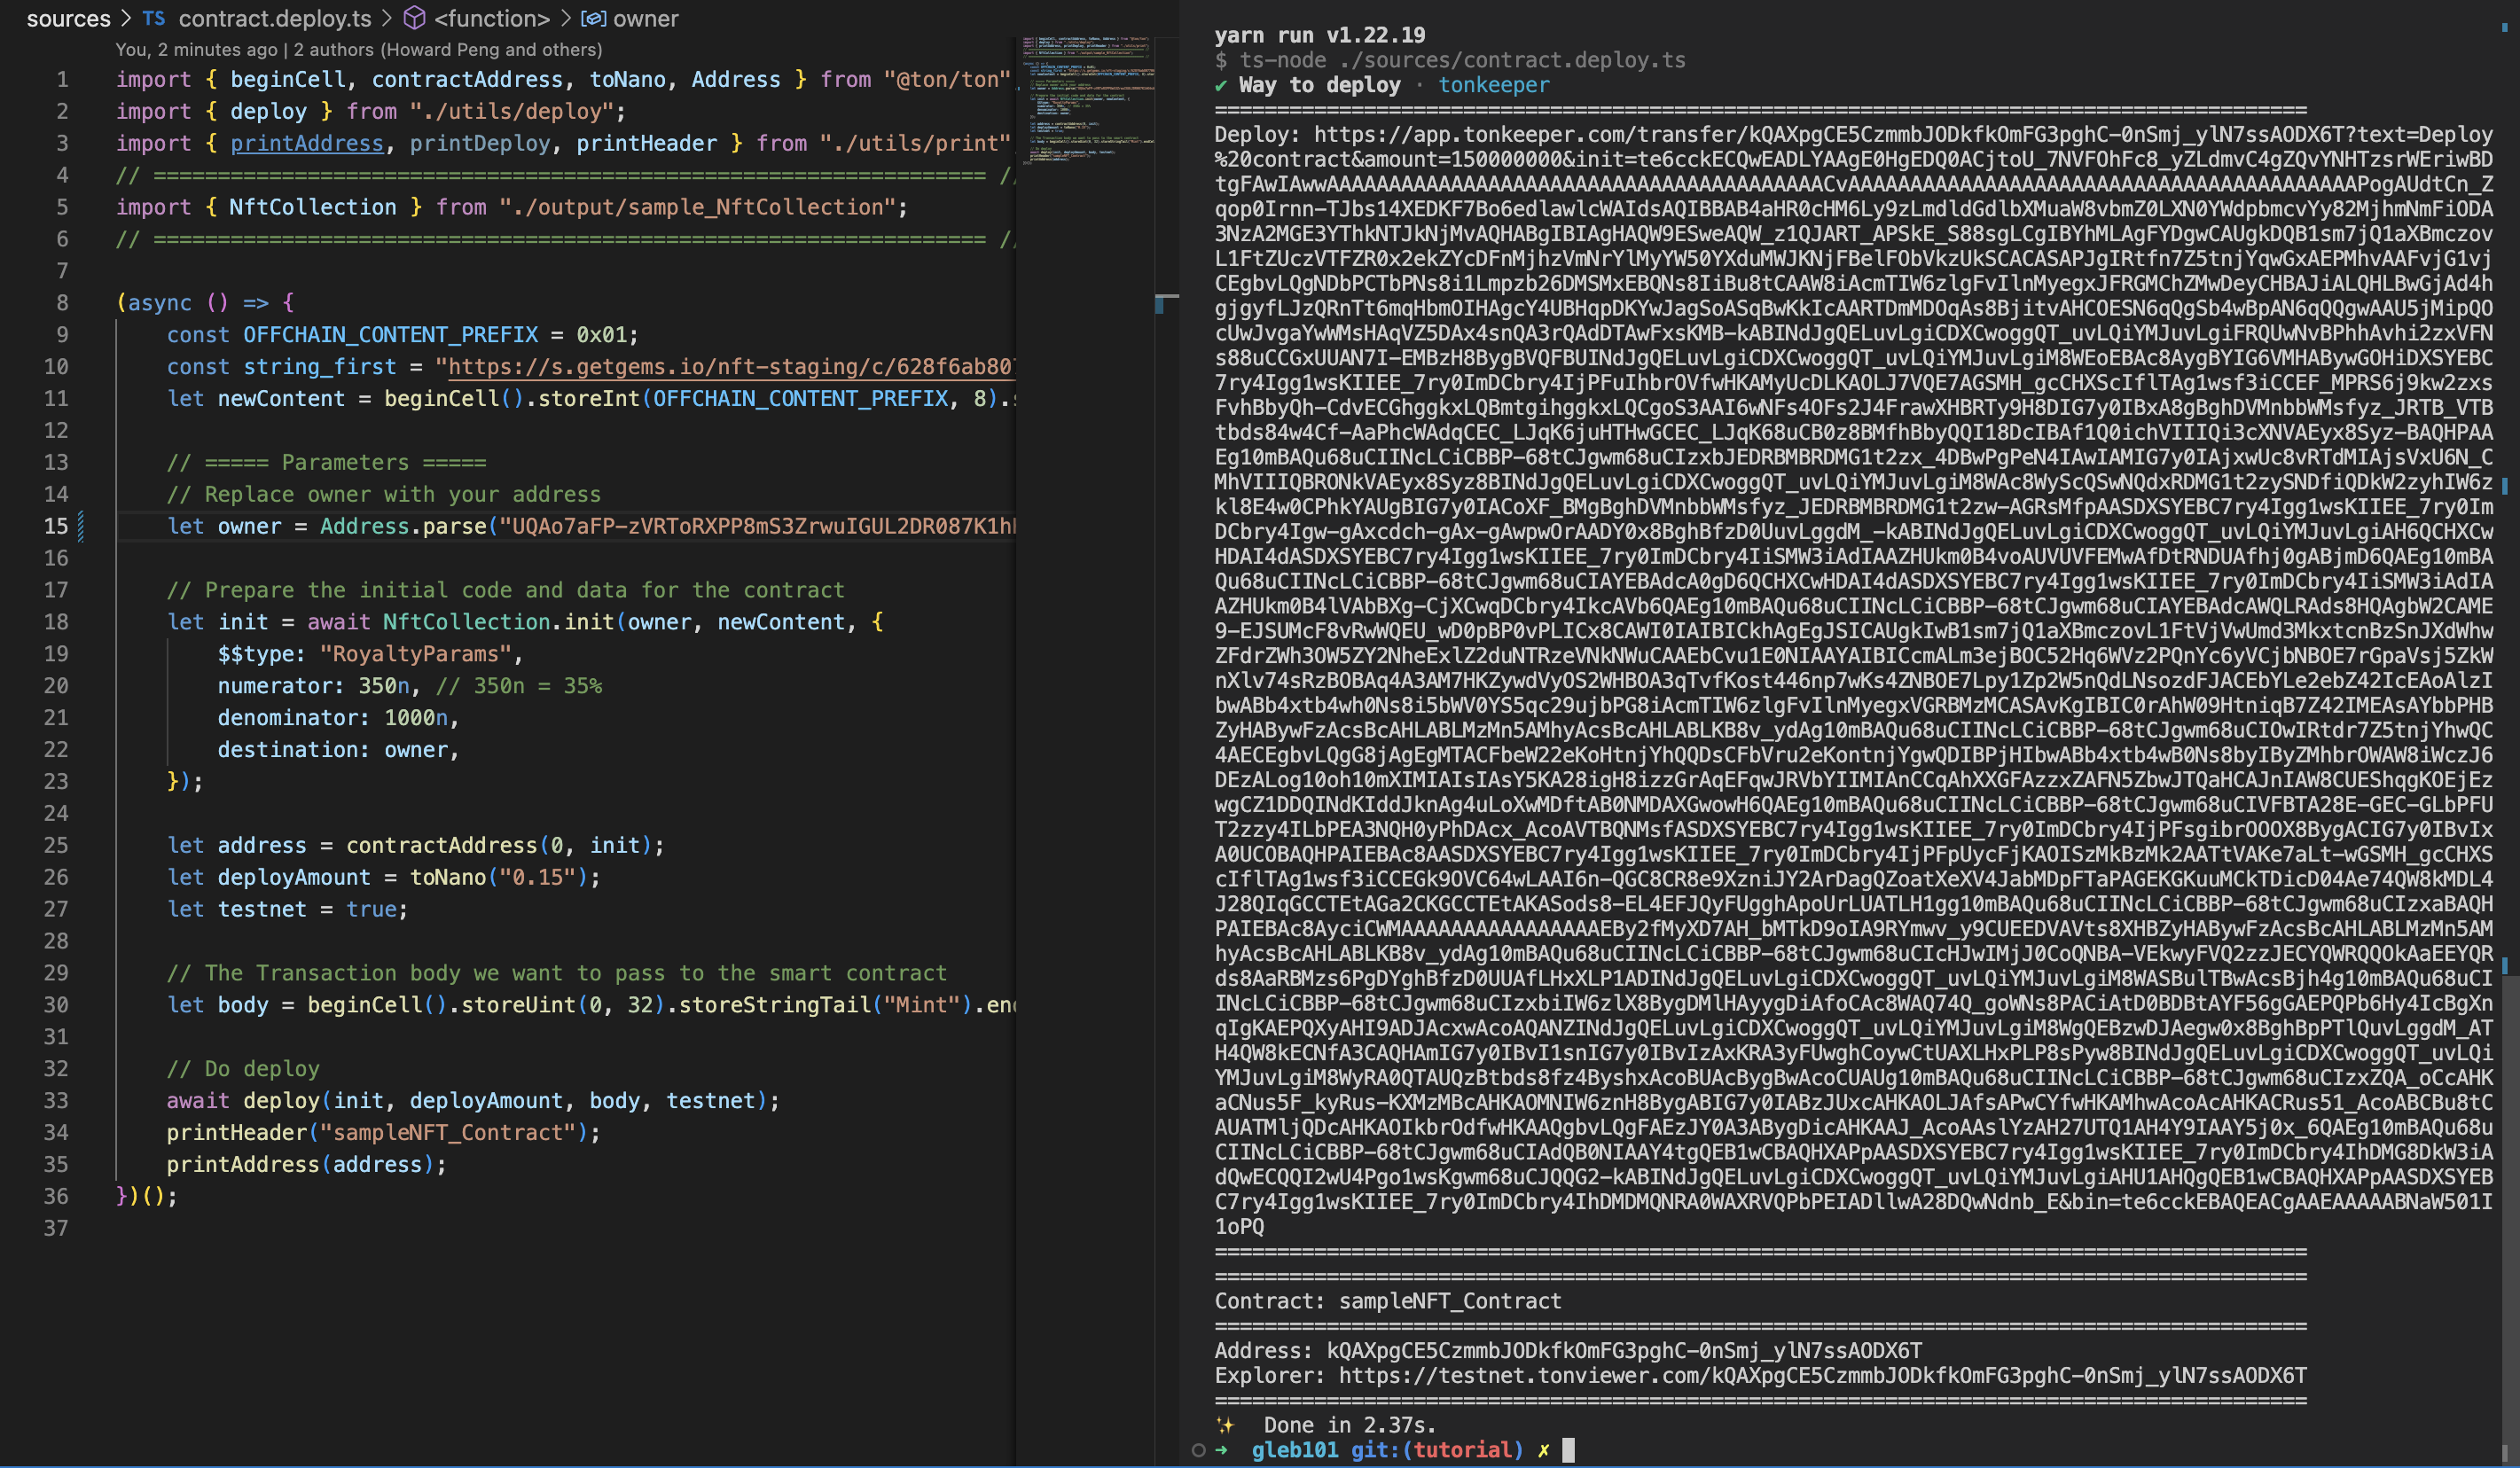
    Remember to change the parameter in contract.deploy.ts file before you run yarn deploy

    Alt text


    alt text – once you run yarn deploy you will get the address of the deployed contract. You can use this address to interact with the contract.

    More

    For more information about this GitHub repository, or if you have any questions related to Tact, feel free to visit:

    If you have more specific questions related to the Tact Language, please refer to:

    Visit original content creator repository https://github.com/howardpen9/nft-template-in-tact
  • Alexander-McQueen-web-scraped-data

    Alexander McQueen web scraped data

    About the website

    Alexander McQueen is a globally recognised British luxury fashion brand founded by the late fashion designer Lee Alexander McQueen in 1992. Known for its impeccable blend of modernity with traditional techniques, the design house has pushed the boundaries of fashion since its inception. The company was later sold to Gucci Group NV, which is now a part of the French conglomerate, Kering S.A that is listed on the Euronext Paris (KER.PA). The Wikipedia and Bloomberg profile of Alexander McQueen provides an in-depth analysis of the fashion houses history, notable collections, and current operations.

    Alexander McQueen operates in the highly competitive luxury fashion market that includes rivals like Chanel, Prada, and Gucci. Just like McQueen, these brands are known for celebrating a distinct fashion ethos through their unique designs. Chanel, founded by Coco Chanel, is renowned for its class and elegance, as can be further explored on its Wikipedia and Bloomberg pages. Prada, is a popular brand with an innovative and attention-grabbing style, seen on their Wikipedia and Bloomberg profiles. Finally, Gucci, renowned for its eclectic and contemporary luxury, can be explored further on its Wikipedia and Bloomberg pages.

    Web scraped data plays a key role in providing insights into the buyers behaviour, preferences, and trends for Alexander McQueen. It helps the brand to strategically price their products and determine discounts based on competitor pricing, popular items, and seasonal trends. For instance, if the data reveals that a competitor is offering similar designs at lower prices, McQueen can adjust their prices or offer special discounts to maintain their sales and market share. Similarly, identifying the bestselling items can assist in designing future collections and allocating marketing resources. On the other hand, during the sale season, scraping data can bring out the most discounted products and the fluctuations in rates, allowing the brand to maintain a profitable margin while remaining competitive.

    Link to dataset

    Alexander McQueen dataset

    Visit original content creator repository
    https://github.com/databoutique/Alexander-McQueen-web-scraped-data

  • SegmentedProgressBar

    Visit original content creator repository
    https://github.com/naseemakhtar994/SegmentedProgressBar

  • cie-PN532

    cie-PN532

    Arduino library for SPI access to the PN532 NFC chip in the Italian Electronic Identity Card (CIE).


    Warning


    Online resources

    Online documentation Demonstration video

    Prerequisites

    This library depends upon a modified version of the Adafruit_PN532 library which you can obtain from this GitHub Repository.

    https://github.com/BrightSoul/Adafruit-PN532

    You must install the Adafruit_PN532 and cie_PN532 in your Arduino libraries directory. Plese follow the instructions from the Arduino guide.

    https://www.arduino.cc/en/Guide/Libraries

    Wiring PN532 breakout to the Arduino Uno for SPI communication

    At present, just the SPI connection is supported. The examples provided will work with this wiring.

    images/pn532-wiring-spi.png

    This wiring is also described in detail on this page at the Adafruit website.

    https://learn.adafruit.com/adafruit-pn532-rfid-nfc/breakout-wiring

    Getting started

    Create a new arduino project and set it up like this:

    //Include some libraries
    #include <Wire.h>
    #include <SPI.h>
    #include <cie_PN532.h>
    
    //Use the cie_PN532 with the typical wiring, as pointed out above
    cie_PN532 cie();
    
    void setup(void) {
      #ifndef ESP8266
        while (!Serial); // for Leonardo/Micro/Zero
      #endif
      Serial.begin(115200);
      //Initialize the PN532 breakout board
      cie.begin();
    }

    Then, in your loop, wait for a card then read its ID_Servizi (a low-security unique identifier)

    void loop(void) {
      //Let's see if a card is present
      bool cardDetected = cie.detectCard();
      if (!cardDetected) {
        //No card present, we wait for one
        delay(100);
        return;
      }
    
      //Good! A card is present, let's read the ID!
      word bufferLength = EF_ID_SERVIZI_LENGTH;
      byte buffer[EF_ID_SERVIZI_LENGTH];
    
      if (!cie.read_EF_ID_Servizi(buffer, &bufferLength)) {
        Serial.print(F("Error reading EF.ID_SERVIZI"));
        delay(1000);
        return;
      }
    
      //We were able to read the ID_Servizi, print it out!
      Serial.print(F("EF.ID_Servizi: "));
      cie.printHex(buffer, bufferLength);
    }

    More examples

    This library comes with an examples directory. You can load and run examples from the Arduino IDE by clicking the File menu -> Examples -> cie 532.

    Useful links

    • The CIE 3.0 chip specification (italian)

    http://www.agid.gov.it/sites/default/files/documentazione/cie_3.0_-_specifiche_chip.pdf

    • Technical specification for the European Card for e-Services and National e-ID Applications

    http://www.unsads.com/specs/IASECC/IAS_ECC_v1.0.1_UK.pdf

    • Specifiche tecniche del documento digitale unificato (italian)

    http://www.agid.gov.it/sites/default/files/leggi_decreti_direttive/specifiche_tecniche_del_documento_digitale_unificato_v.1.0.0.pdf

    Visit original content creator repository https://github.com/italia/cie-PN532
  • Plant ID Bot

    Plant ID Bot

    A plant identification bot for your Discord server.

    Plant ID Bot identifies plants from photos of their organs, passing to the Plantnet API for identification. This bot was written for Sustainable Living Hub

    If you wish to invite this bot to your server, use this link. However, your server will be limited to a maximum of 20 idendifications every 24h. It is strongly preferred that you host a version of this bot yourself and register for your own PlantNet API key. Details for this are later in this readme file.

    Features

    • Takes the message picture attachments and attempts to identify them
    • Returns a suggested plant name and up to 2 alternatives, with a percentage confidence rating
    • Plant names are given in latin with a list of possible common names
    • Provides links to GBIF and PFAF for the identified plant

    Prerequisites

    Plant ID Bot uses a small number of prerequisites in order to work properly:

    • Pycord – a modern, easy to use, feature-rich, and async ready API wrapper for Discord, written in Python
    • Beautiful Soup – a python library for pulling data out of HTML and XML files
    • python-dotenv – for reading local .env files during development

    Installation

    To add the Plant ID bot from this repository to your discord server, use this invite.

    If you fork this repository and wish to host your own version of this bot, you will need to:

    • Create a new account at Plantnet API.
    • Create a new application and bot at the Discord Developer Portal. Follow this guide if you are unsure.
    • Create a local .env file to store DISCORD_TOKEN and PLANTNET_API_KEY. Add both your bot’s secret token and PlantNet API key here repectively.
    • Enable the bot permissions ‘Read Messages/View Channels’, ‘Send Messages’, ‘Embed Links’, ‘Add Reactions’
    • Host the files on your platform of choice. A Docker Compose file is supplied if that is the route you wish to take.
    • Add the bot’s secret token and your PlantNet API key to your platform’s environment variables under the keys DISCORD_TOKEN and PLANTNET_API_KEY.

    Development

    Want to contribute? Simply fork, edit and then create a pull request. Details of how to do this can be found here.

    Credits

    • themanifold who cast his careful eye over the code, making sure that I wasn’t making any obvious errors, and for making my todo list longer each day
    • Country Roles from which my knowledge of Discord.py ‘cogs’ was solidified. Their implementation of ‘BotInfo’ was used to create more information on the bot, and generally helped me clean up my code

    License

    MIT

    Visit original content creator repository
    https://github.com/TheRealOwenRees/plantID_discordbot