This GIT repository is managed by the Bincrafters team and holds files related to Conan.io. For detailed information about Bincrafters and Conan.io, please visit the following resources:
Bincrafters packages are hosted on Bintray and contain Open-Source software which is licensed by the software’s maintainers and NOT Bincrafters. For each Open-Source package published by Bincrafters, the packaging process obtains the required license files along with the original source files from the maintainer, and includes these license files in the generated Conan packages.
The contents of this GIT repository are completely separate from the software being packaged and therefore licensed separately. The license for all files contained in this GIT repository are defined in the LICENSE.md file in this repository. The licenses included with all Conan packages published by Bincrafters can be found in the Conan package directories in the following locations, relative to the Conan Cache root (~/.conan by default):
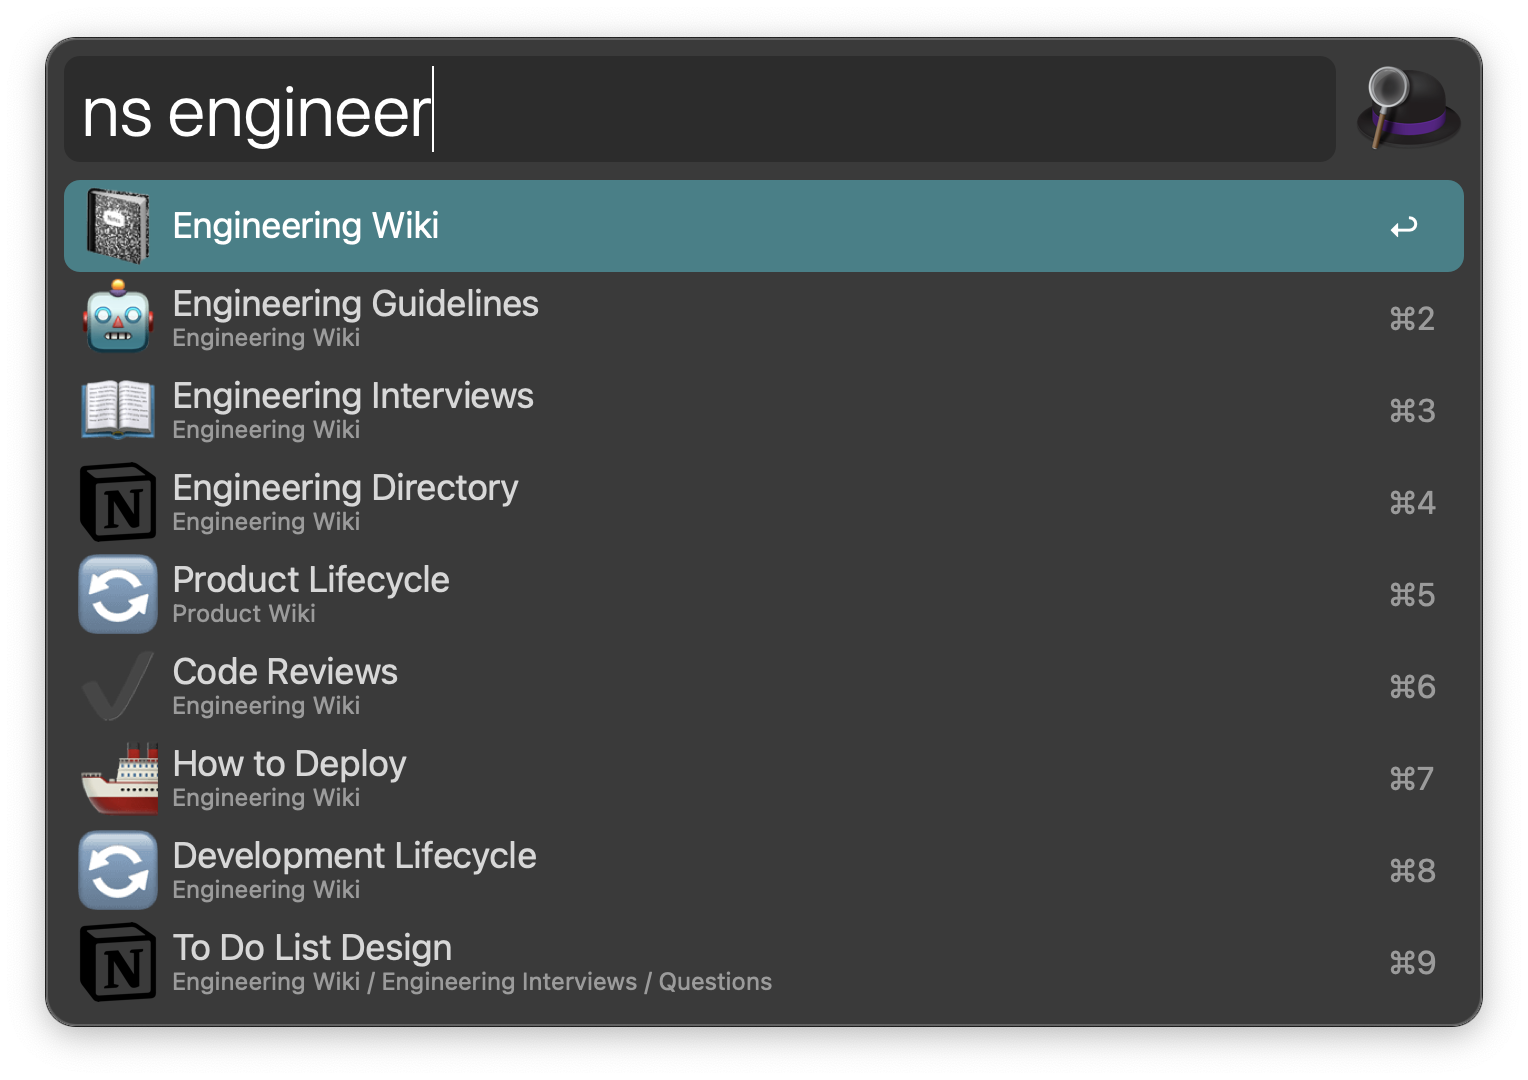
Simply type your keyword into Alfred (default: ns) and provide a query to see instant search results from Notion that mimic the Quick Find function in the Notion webapp.
Pressing enter on a search result takes you to that page in Notion in your default web browser or notion app.
Hold Cmd + press enter on any search result to copy the url to your clipboard.
Additional features
Comes with pre-configured support for OneUpdater for automatic version updates.
The workflow also provides the ability to quickly see your recently viewed pages. Simply type the ‘ns’ keyword to start the workflow, as you would before you search, and your most recently viewed notion pages are displayed.
Open a new notion page by typing ‘nsn’, this only supports the web app currently, it’s very handy!
User Configuration
Cookie: Needed for your Notion token.
Space ID: Your organisation identifier.
Use Desktop Client: Defaults to False. Determines whether to open Notion links in the desktop client rather than the web app.
It’s recommended to leave the following variables to their defaults, unless you’re confident:
Navigable Only: Defaults to False. Setting to false allows you to search objects within a page, ie notion objects that cannot be found through the left hand side navigation pane.
Enable Icons: Defaults to True. This toggles support for Notion icons to be shown natively in Alfred search results, for a better design/UX experience. Custom Notion icons are downloaded on demand and cached.
Show Recently Viewed: Defaults to True. This toggle determines if recently viewed pages should be shown when there is no query provided by the user and the user id is present in the supplied cookie (user id is needed for the api call to show recently viewed pages).
Icon Cache Days: Defaults to the recommended value of 365 days for the best performance. Defines the number of days to cache icons and images. Min 0, max 365.
Install Steps
Install Python3
Many people will have Python3 already on their machine, if you haven’t you can try to run python3 from a Terminal window and it should prompt you to install the Xcode CLI tools automatically (which include Python).
Otherwise you can read a more detailed guide on installing Python here.
Install cairosvg (optional)
Installing cairosvg will allow svg icons to be shown in Alfred search results, providing a more visually appealing experience. Open terminal and run the following command:
pip3 install cairosvg
Install cairosvgs’s dependency, cairo. With Homebrew for example:
brew install cairo
If you haven’t used homebrew before, you may want to skip this optional step or install homebrew (easy with a quick google search).
UPDATE: There seems to be an issue with cairosvg on apple silicon, use this fix at your own risk but this worked for me and now SVG icons show again:
I recommend using chrome to retrieve these values. If you can only use safari you can copy the ‘token_v2’ value by following the equivalent steps above and populating the cookie env variable in Alfred so it looks like this token_v2=XXXXXXXXXXXX (however this means the recently viewed pages feature will not work for you).
Visit the Notion webapp and use your browser developer tools to see the network requests being made when you type in anything to the quick find search bar. In Chrome select ‘View’ in the toolbar > Developer > Developer Tools. Then select the Network tab in the developer tools window.
Here you’ll see a request called search, check the request headers to copy the cookie value and check the request payload to copy your notionSpaceId, as shown in the screenshots below.
Known issue: Some users have experienced issues with copying these values directly from developer tools, but have seen success by copying and pasting the values into TextEdit or a different text editor first, this probably “strips out” or removes any problematic formatting.
Get your cookie headers
They should look something like this
Get your spaceId
It should look something like this
celcl9aa-c3l7-7504-ca19-0c985e34ll8d
Install the Notion Alfred worflow
Download and double click the latest release for your version of Alfred, following the links at the top of this page.
Add these values to the Notion Alfred workflow
Alfred should automatically open the ‘configure workflow’ options panel when you first install the workflow, here you can add the values obtained through the above steps.
You can also update these values at any time by clicking Configure Workflow..
Troubleshooting
The script may fail due to an SSL error. If the script isn’t working, turn on debugging by clicking on the little cockroach in the alfred workflow screen. If you see an error like:
The single quotes are required.
If this file doesn’t exist, run “python –version” to find out what version you have
and update the directory accordingly.
Tips
If you prefer using the Mac app rather than using Notion in your browser, check Use Desktop Client under the menu that appears when you click ‘Configure Workflow..’ as shown above in the install steps section.
liveusb-builder is a script suite to create multiboot USB stick for GNU/Linux distributions. It’s lightweight with few dependencies, and it’s extensible and hackable.
liveusb-builder needs a kernel image, an initramfs image, and a proper kernel command line to support a boot image. However, not every CD/DVD image supports booting this way. There are some other ways to boot these images, but they will break our philosophy to support various firmware and bootloaders.
If you want to use a disk image to install an operating system, I suggest using the virtual machine method as follows. Boot an AMD64 machine with enough memory and VMX feature with a Live USB with QEMU GUI (e.g. Grml 2020.06, also see my ticket for Grml) after attaching the hard disk you want to install the OS on, then run the following (assume the hard disk attached is /dev/sda):
Do the system installation in the QEMU window. After QEMU exits, put the hard disk on the target machine to continue installing.
I’ve already used this method to successfully install Windows 7, OpenBSD 6.7, and various GNU/Linux systems.
Usage
First, you need to have a partitioned USB drive. For the best legacy BIOS compatibility, it’s recommended to use MSDOS (MBR) partition table. Because most UEFI firmware only supports FAT32 partitions, you need a FAT32 partition on the USB drive, and put the boot files into this partition.
The easier way: one FAT32 partition
Suppose your USB stick device is /dev/sdb and the partition on the device is /dev/sdb1.
# install Arch, Mint (x86_64 with MATE Desktop) and Fedora 32 to USB
./buildlive --root=/dev/sdb1 arch mint/mate fedora/32
The other way is to mount your USB drive partition first. I recommend using udevil so that you can write files without as root.
Then run buildlive script as follows, suppose /dev/sdb1 is mount to /media/sdb1:
# install Arch, Mint (x86_64 with MATE Desktop) and Fedora 32 to USB
./buildlive --root=/media/sdb1 arch mint/mate fedora/32
The more customizable way: using a FAT32 boot partition and an ext2 data partition
Partition your disk as follows to create a 500MB FAT32 boot partition, and an ext2 partition using the remaining space, suppose your USB is /dev/sdb.
$ sudo fdisk /dev/sdb

Command (m for help): o
Created a new DOS disklabel with disk identifier 0x24c5dd70.

Command (m for help): n
Partition type
   p   primary (0 primary, 0 extended, 4 free)
   e   extended (container for logical partitions)
Select (default p):

Using default response p.
Partition number (1-4, default 1):
First sector (2048-30463999, default 2048):
Last sector, +sectors or +size{K,M,G,T,P} (2048-30463999, default 30463999): +500M

Created a new partition 1 of type 'Linux' and of size 500 MiB.

Command (m for help): t
Selected partition 1
Hex code (type L to list all codes): b
Changed type of partition 'Linux' to 'W95 FAT32'.

Command (m for help): a
Selected partition 1
The bootable flag on partition 1 is enabled now.

Command (m for help): n
Partition type
   p   primary (1 primary, 0 extended, 3 free)
   e   extended (container for logical partitions)
Select (default p):

Using default response p.
Partition number (2-4, default 2):
First sector (1026048-30463999, default 1026048):
Last sector, +sectors or +size{K,M,G,T,P} (1026048-30463999, default 30463999):

Created a new partition 2 of type 'Linux' and of size 14 GiB.

Command (m for help): w
The partition table has been altered.
Calling ioctl() to re-read partition table.
Syncing disks.
The resulting USB stick works on QEMU with PC BIOS (SeaBIOS), UEFI (OVMF), libreboot (i440fx, GRUB txtmode) as firmware.
The script testusb.sh can be used to test a USB stick with QEMU.
Related work
You can search keyword multiboot on GitHub and find some related projects. Listed below is some related work I know or find.
Yumi: a Windows GUI multiboot USB builder, I need a similar tool that runs on GNU/Linux, so I created this project
aguslr/multibootusb: provides grub.cfg files for many CD images, I used some of the kernel command line of distros in this project, but some grub.cfg files use features provided by GRUB and thus not portable for loaders like syslinux
Ventoy: a new multiboot USB project that supports making a live USB with most of the CD images. It has its own boot loader so doesn’t rely on GRUB or syslinux config files.
A beginner-friendly template for building interactive graphics and games using Pixi.js with TypeScript and Webpack. This boilerplate simplifies the setup process, allowing developers to quickly start creating engaging web experiences.
Recent update ( 12.04.2025 )
🆕 Updated to Pixi v8: The latest version of Pixi.js brings significant performance improvements, WebGPU support, and enhanced rendering capabilities
Recent update ( 25.12.2023 )
🆕 Updated to Pixi v7: The latest version of Pixi.js brings enhanced features and performance improvements
🔧 Stability Overhaul: Moved from swc to ts-loader for improved stability and compatibility
Revised and Updated Dependencies: All package dependencies have been reviewed and updated to their latest versions for optimal performance and security.
Features
🔰 – Beginner-friendly setup and structure.
🚀 – Optimized build times.
🛠 – Full TypeScript support for robust type-checking.
✈️ – Live reload for efficient development workflow.
📝 – Consistent code style using Prettier and Eslint
Usage
Click on the green button “Use this template” on top of the repo or
I was looking for a nice and easy way to setup my environment variables to run houdini on Mac and Linux.
The idea is to have one launcher which detects your current OS and set the different environment variables.
e.g. i use redshift on linux but not on mac os and some cache drive are only avaiable on linux, on mac i need to deactivate the third mouse button….
This pre-defined setup will clone or update all necessary repositories from Github like:
Gamedevelopertools, batch_textures_convert, MOPs, qLib, Lynx.
It comes with some custom hda’s and my own desktop configuration for mac and linux. It will also setup all the typical folders.
Installation for OS X and Linux:
clone or download this repository to your server
edit the Houdini_Launcher.sh and change the path from line 8 to your installation directory e.g.” export HOUDINI_PIPELINE=”yourpath/Houdini_Pipeline“
copy the edited Houdini_Launcher.sh to all of your Project folder where you want to start Houdini.
if you like to run it without commandline, rename the launcher from Houdini_Launcher.sh to Houdini_Launcher.command which makes the file executable with a double click.
Installation for Windows:
TBA
ToDo:
-support for windows and our internal pipeline stucture.
You will need to specify the “Query” and “Mutation” strings
const Query = `
  # A GraphQL API for my App
   type Query {
     readUser(id:String):user,
     config:Config,
   }`

const Mutation = `
   type Mutation {
     logError(type:String!, message:String!,args:String!,trace:String!):Error
   }
`
Query and Mutation Api function will map to the same object
var root = {
// Query
readUser: (args)=> db.getUser({_id:args.id}),
config: () => fs.readFileAsync(__dirname + "/config.json"),

// Mutation
logError: (args)=>{
  const type      = args.type;
  const message   = args.message;
  const errorArgs = args.args;
  const trace     = args.trace;

  return db.saveError(message,{type,errorArgs},trace)
           .then( x => args ) // return the error back to use
  },
}
A wrapper over d2 which allows to use layout, theme, dark-theme, pad, sketch and port attributes from d2 file. All arguments will be passed to the
d2 cli, but these additional configs overwrite cli arguments with the same name.
Install
Nix Flake
This repo is also packaged via Nix flakes, the package is available through the
default flake output github:pleshevskiy/wd2 with the path bin/wd2.
You can enable flakes support in your nix configuration, and then run nix
profile install github:pleshevskiy/wd2 to get wd2 installed. You can also
use this repository as a flake input and add its output to your own
flake-managed systemwide or home configuration.
Other
Copy wd2 script to /usr/local/bin folder.
Usage
Create a d2 file with additional configs at the top.
# layout: elk# theme: 101# pad: 5x -> y -> z
Then run the wd2 script
wd2 -w path/to/your/file.d2
You can also use inline style to configure d2
# layout: elk; theme: 101; pad: 5x -> y -> z
Limitation
You have to restart the watch server when you change the layout, theme, pad and other attributes in a specified d2 file


 https://github.com/bincrafters/conan-geographiclib